


.avif)
What is Serverless?
In the ever-evolving world of technology, new terms, and concepts are constantly emerging, often leaving non-tech individuals feeling overwhelmed. One such term that has been making waves in the tech industry is 'Serverless'. But what exactly does it mean?
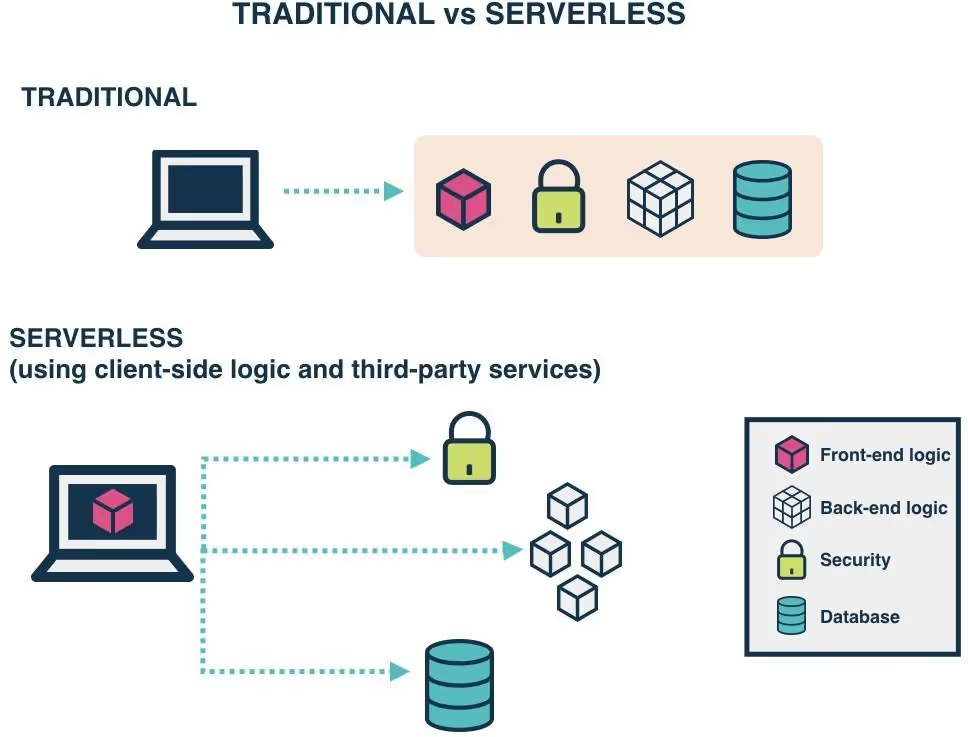
In the simplest terms, 'Serverless' is a cloud computing execution model where the cloud provider dynamically manages the allocation and provisioning of servers. Traditionally, running applications or services online requires the constant management and maintenance of servers. This was both time-consuming and costly. However, with the advent of Serverless technology, this burden is lifted.
Serverless computing allows developers to build and run applications and services without worrying about the underlying infrastructure. The cloud provider handles all the server management tasks, such as capacity planning, maintenance, updates, and scaling. This means developers can focus on writing code and creating applications while the cloud provider handles the rest.
The Bubble Problem
One of the main concerns with Bubble’s Backend workflows is its performance. While Bubble is great for creating simple applications, it can struggle when it comes to handling complex tasks or large amounts of data. This is where Firebase Functions come into play. It can handle complex business logic with ease, ensuring your application runs smoothly and efficiently, regardless of the task at hand.
And the second point is Bubble's recent changes to its pricing model. To put it into perspective, Firebase Cloud Functions offers 2 million invocations (executions) monthly for free. Beyond this, the next 1 million invocations are priced at just $0.40. This is a stark contrast to the current pricing model of Bubble, which can become quite costly for applications with high user traffic or intensive data processing needs.
While Bubble's no-code interface is user-friendly for non-tech people, Firebase and JavaScript offer superior performance, scalability, and cost-effectiveness. Don't be daunted by the prospect of learning to code - with tools like OpenAI’s ChatGPT, it's easier than ever. These AI-powered chatbots can guide you through the learning process and even assist with coding.
Serverless providers
As we dive deeper into the world of serverless computing, it's important to note that Firebase Functions is not the only player in the game. Several other serverless platforms offer similar functionality, each with its own unique features and benefits. Let's take a look at some of these options:
- Supabase Functions: Supabase is an open-source alternative to Firebase. It offers a suite of tools, including a real- time database, authentication, and serverless functions. Supabase Functions allow developers to write and deploy server-side code without managing a server.
- Amazon Lambda: As part of the Amazon Web Services (AWS) suite, Lambda is a highly popular serverless computing service. It runs your code in response to events, such as changes to data in an Amazon S3 bucket or updates in a DynamoDB table, and automatically manages the resources required by your code.
- Cloudflare Workers: Cloudflare Workers provide a serverless execution environment that allows you to create entirely new applications or augment existing ones without configuring or maintaining infrastructure. It's particularly known for its exceptional performance due to Cloudflare's extensive global network.
- Microsoft Azure Functions: Azure Functions is Microsoft's serverless computing service. It enables developers to run event-triggered code without having to explicitly provision or manage infrastructure. Azure Functions support multiple programming languages and integrate with various other services in the Azure ecosystem.
- And other…
In Sommo, we prefer to use Firebase Functions. It has a straightforward, intuitive interface and flexible pricing model, Firebase follows a pay-as-you-go model, meaning we only pay for what we use.
Another compelling reason for our choice is that Firebase is based on Google Cloud infrastructure. This opens up a gateway to a lot of different services that we can leverage to enhance our applications.
Prepare Project Environment
1. Install NodeJS: NodeJS is a runtime environment that lets you run JavaScript on your computer outside of a web browser. You can download it from the official NodeJS website. Make sure to choose version 18, to make Firebase work correctly. If you’re reading this article not in 2023, it might be that Firebase already updated their recommended NodeJS version to 20, check it here.
2. Open a Terminal app: A terminal, also known as a command line or console, is a text-based interface where you can run commands on your computer. In this tutorial, I will use MacOS (Linux) terminal. For a Windows user, it’s named Command Prompt or PowerShell. You can find these by searching for them in the Start menu.
3. Install Firebase Tools: Firebase Tools is a set of command-line tools for managing Firebase projects. To install it, you need to run a command in your terminal. Type
and press Enter.
4. Login to Firebase: To connect your local environment to your Firebase account, you need to log in. Type
in your terminal and press Enter. This will open a new window in your web browser where you can log in to your Firebase account.
5. Create a Project Directory: This is a folder on your computer where you'll store your Firebase project files.
6. Navigate to Your Project Directory: If your new folder is on your desktop and named "my-firebase-project", you would type
and press Enter.
Create Firebase Project
To set up a new Firebase project in your project directory, you need to run the
command in your terminal. This will guide you through a series of prompts to set up your project.
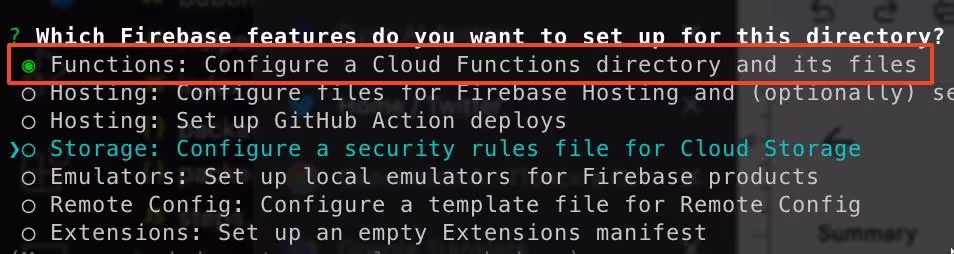
1. Select Functions in a list of features. command in your terminal.
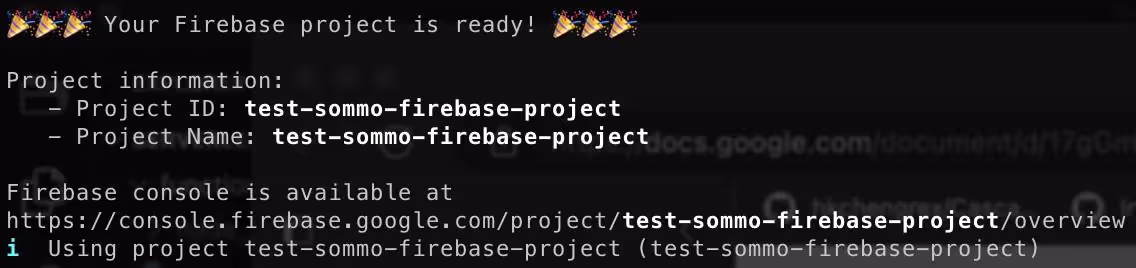
2. Create a new project and specify a unique id. If you did everything correctly, you will a congrats message:
3. Choose a programming language. We will use JavaScript for this tutorial.

4. And a few following options:

Tip: In some cases, if you’ve installed the wrong version of NodeJS, you will get such error:

5. That’s it, we’re ready to go!
In the next section, I will guide you on how to run your code locally.
Run your Cloud Function
1. Open your project. I recommend you download Visual Studio Code or use any other IDE you like.
2. Your initial project will have a similar structure. All the magic is happening in index.js file. So, let’s navigate there.

- In the index.js file, you will find a simple start code:
Let’s ask Chat-GPT what it means.
Chat-GPT:
The provided code is an example of a Firebase Cloud Function written using Firebase Functions version 2. It defines a function named "helloworld" that is triggered when an HTTP request is made to the specified endpoint.
Here's a breakdown of what the code does:
1. It imports the necessary dependencies:
- onRequest from "firebase-functions/v2/https": This function allows you to create an HTTP request handler for the Cloud Function.
- logger from "firebase-functions/logger": This is a logging utility provided by Firebase Functions.
2. The code exports the Cloud Function as exports.helloworld. This means that when deployed, this Cloud Function will be accessible at the endpoint associated with the Firebase project.
3. The Cloud Function is defined using onRequest(), which takes a request handler function as an argument. This request handler function receives two parameters: request and response, representing the incoming HTTP request and the response that will be sent back to the client.
4. Inside the request handler function, logger.info() is used to log a message to the Firebase Functions logs. In this case, the message "Hello logs!" is logged, and the {structuredData: true} option indicates that the log message should be structured data.
5. Finally, the response is returned to the client with response.send(). The response contains the string "Hello from Firebase!".
So, when a request is made to the Cloud Function's endpoint, it logs a message and sends a response containing the "Hello from Firebase!" string.
Sounds not that hard? I will not teach you how to use ChatGPT for coding, but I think you got an idea :)
4. To test this code locally, type
in your terminal and press Enter:

- is the local address of your endpoint.
- firebase GUI for the local environment.
5. Let’s send a GET call to our first endpoint. I would recommend you install Insomnia but you can use any other tool/way to make a network request.

6. To deploy a function live (so it can run in the cloud). Simply type the following command in the terminal:
You should get the following message:
Simply navigate there and turn on billing. Don’t worry, Google will not charge you for such a small experiment. From my personal experience, a free tire is totally enough to explore Firebase and play around a lot.
Often it is also free for production, it all depends on your usage :) Check more details about pricing here.
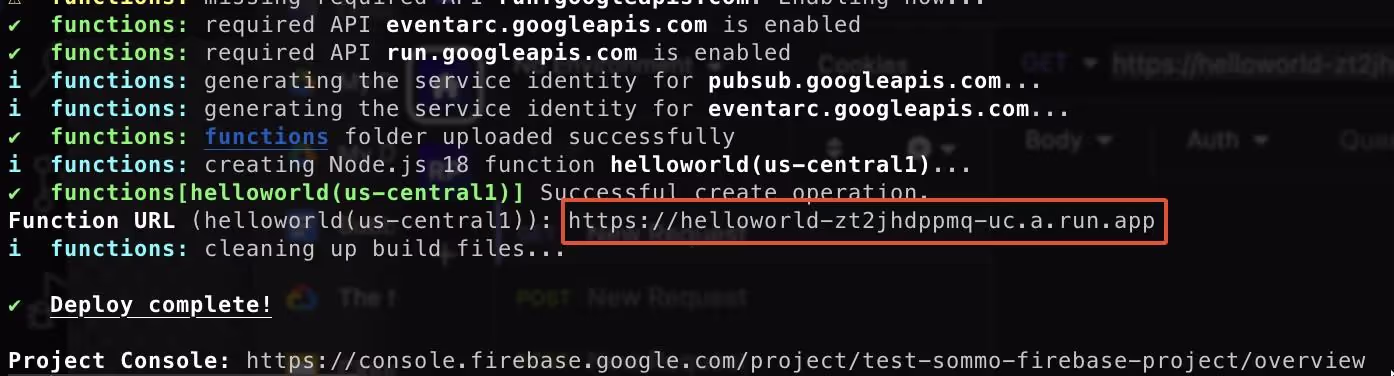
7. After setting up the billing part, simply re-run the command (it might take up to 2 mins to deploy). Then you should get an output of your public endpoint URL:
And that’s it. Now you can replace the local URL with a production one and run a request through Insomnia again. In the next section, we will talk about environment variables and simple authorization (to make sure no one else will access your endpoint).
Environment Variables
Environment variables are a fundamental part of developing with Node.js, allowing your app to behave differently based on the environment you want them to run in.
They are particularly useful when you need to set different settings between your development, testing, and production environments. For instance, you might have a database for testing that's separate from your production database, and you can use environment variables to switch between them.
When working with Firebase Functions, you can use environment variables to store sensitive data, like API keys, or environment-specific data, like Bubble API URLs, etc. These variables are stored in a .env file, which is a simple text file that holds one key-value pair per line.
Let’s create a new file named “.env” and add a line TOKEN=123 (We will use this value in the next section about authorization)

To get your environment variable in a code, use process.env.VARIABLE_NAME:
Sending a request:
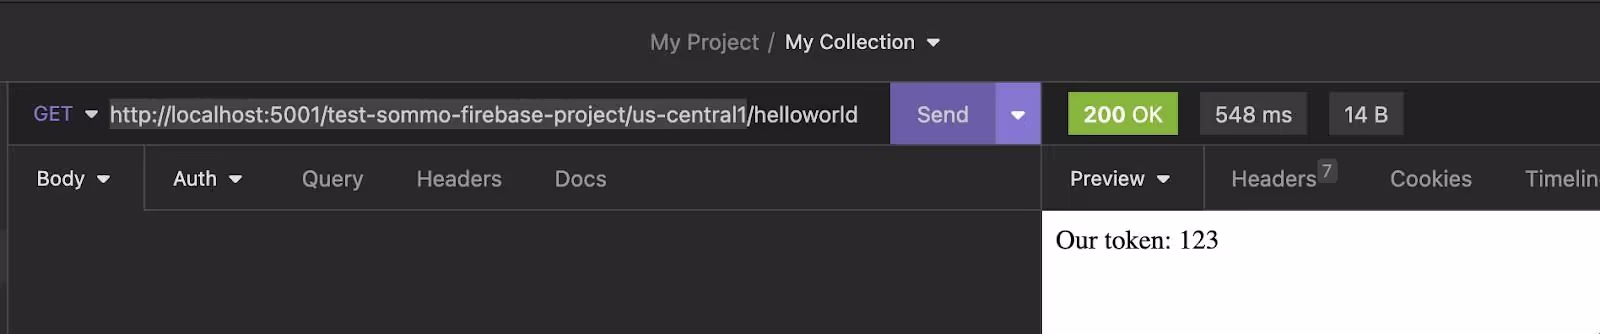
Nothing special, we just used env variables, let’s check now how we simply protect our code from non-authorized execution.
Simple Authorization
When it comes to securing your applications, authorization plays a crucial role. There are various types of authorization methods available, each with its own use cases and benefits. Some of the most common ones include Bearer Token, Basic, and many more.
Bearer Token is a common method used in web APIs. It involves sending a token with each request that the server checks to determine if the client is authorized to perform the requested action.
Basic authorization is a simple method where the client sends a base64-encoded string of the user's username and password with each request. However, it's not the most secure method and is generally only used with other security measures or for simple use cases.
In our example, we will simplify things and will just check an authorization header for a specific string.
Let’s send a non-authorized request:

After adding the token in headers:
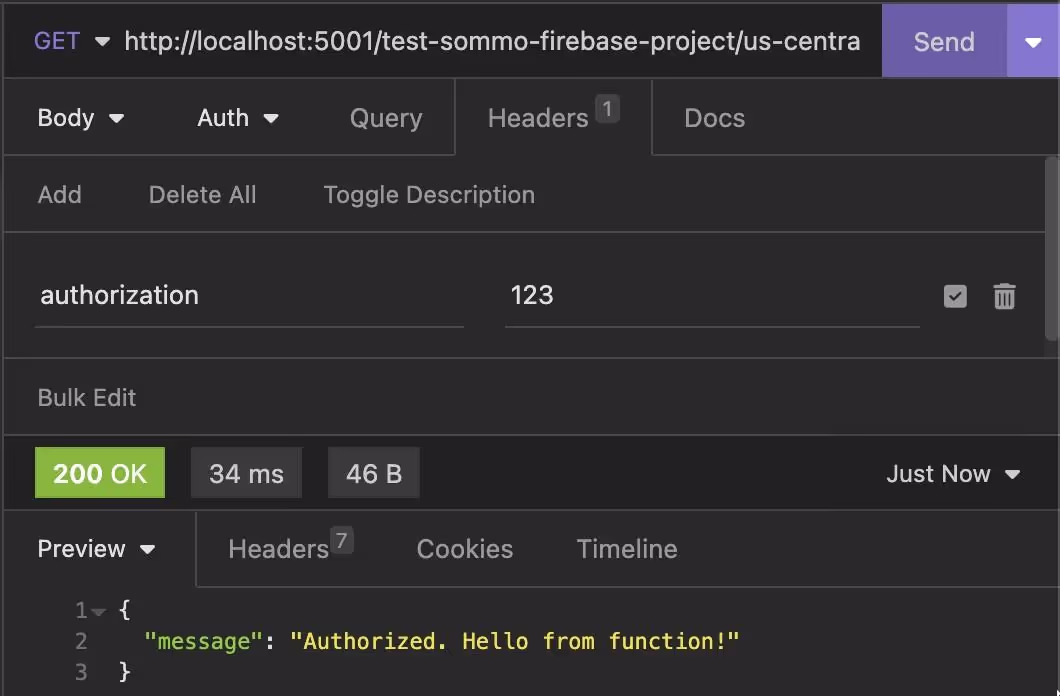
Sounds simple, right? This small step of using an authorization token is a game-changer in safeguarding your endpoints. When it comes to Bubble, my advice is to send these requests via the API Connector. It doesn’t expose keys on the client side, adding another layer of security to your application. So, while it all seems straightforward, these steps are crucial in maintaining a secure and efficient application. In the next section, we will try to write some simple code to communicate with Bubble Data API.
Prepare to communicate with Bubble API
Things will become a bit harder at this stage, but not so much. We have our friend ChatGPT to help us with JS ;)
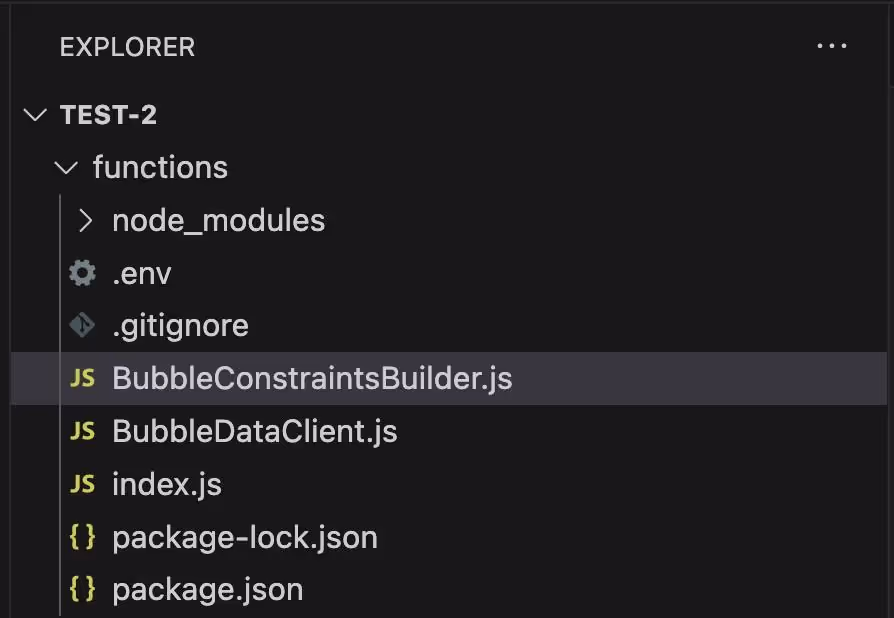
We're going to add two new files to our project. These files will be placed in the functions/ directory of our project. The files contain pre-written code to help us interact with the Bubble Data API more easily. You can find and copy the code for each file from the URLs linked to the filenames below:
These two files act as wrappers around the Bubble Data API. A wrapper, in programming terms, is a piece of code that simplifies a complex function or a set of functions. In this case, these wrappers will make it easier for us to interact with the Bubble Data API, simplifying this tutorial.
Please note that these files are provided "as is". They're designed to help you understand the process and get started quickly, but you may need to modify or extend them to suit your specific needs.
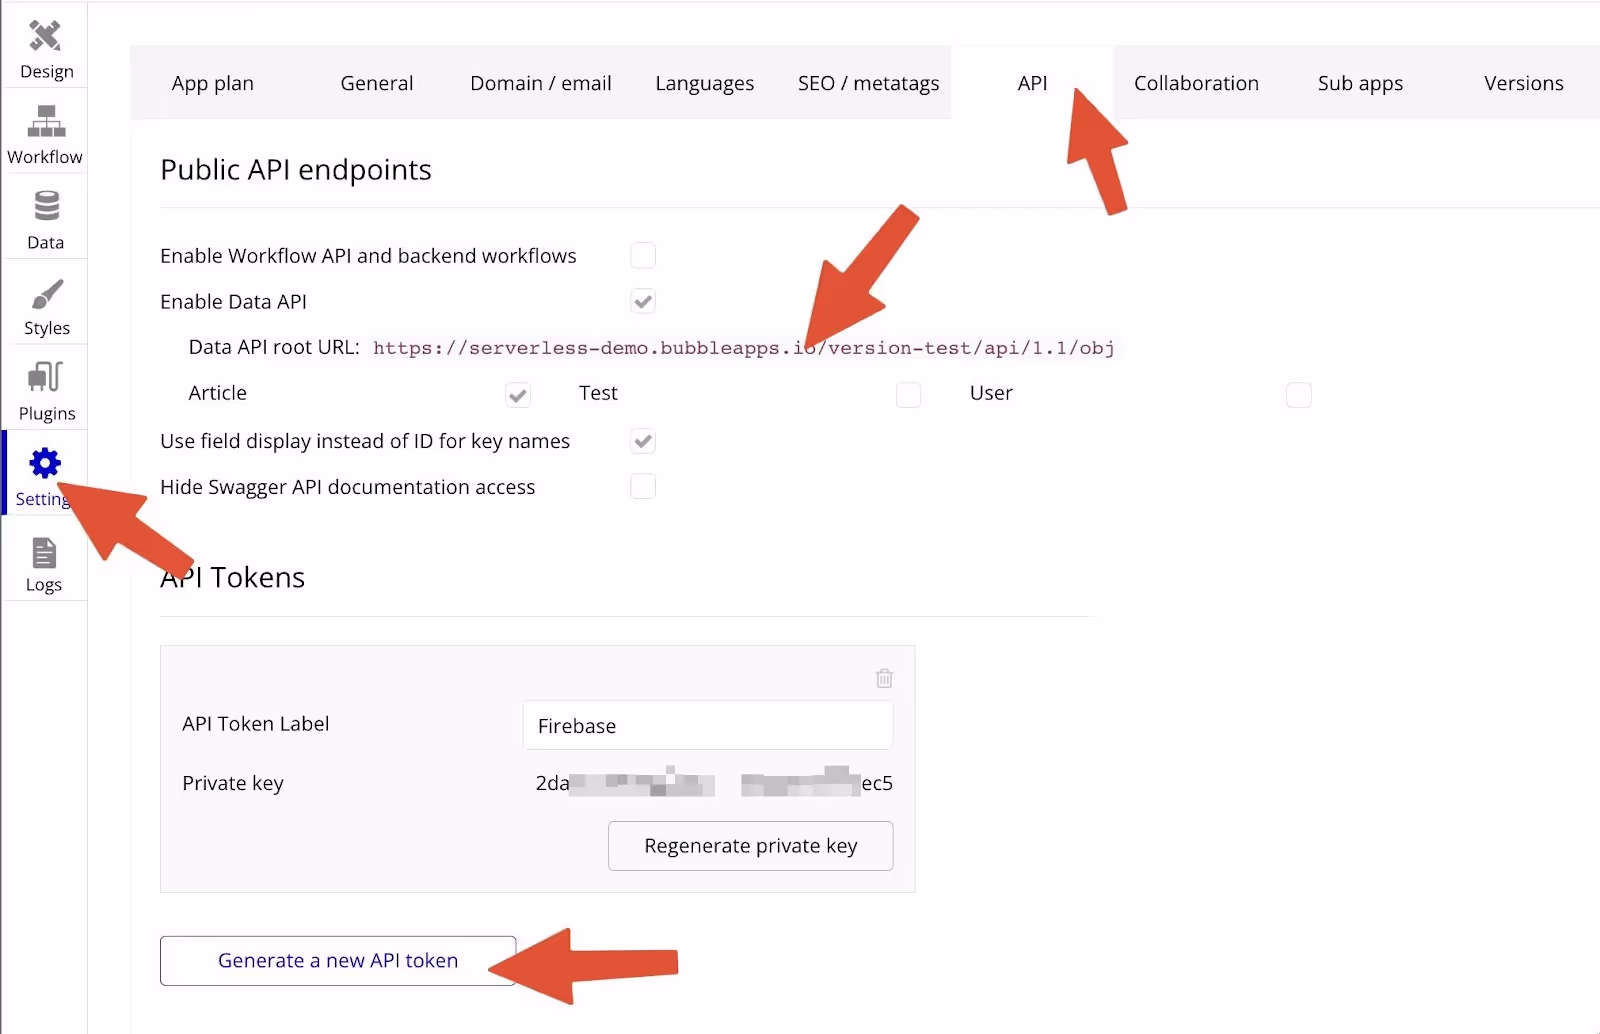
Now let’s switch to Bubble and enable Data API. I assume that you already had experience working with Bubble Data API before, but if not, take a look at their documentation.
- You need to enable Data API.
- Copy Data API root URL.
- Put a checkmark on the Database object that you wanna work with (In our case, it’s Article table).
- Generate API token, and copy it.
Put these two values in our .env file:

Now let’s take a look a bit closer at BubbleConstraintsBuilder.js and BubbleDataClient.js
BubbleDataClient.js is a simple class BubbleDataClient. It contains 4 methods to get, create, delete, and update things.
Get Bubble Things
type = “Article” is the name of your data type that you wanna fetch
constaints = an array value that can be created by ConstraintsBuilder, we will talk about it a bit later
limit = (Pagination) how many items you wanna get
cursor = (Pagination) number of a page
fetchAll = boolean parameter that will recursively fetch all data from the database
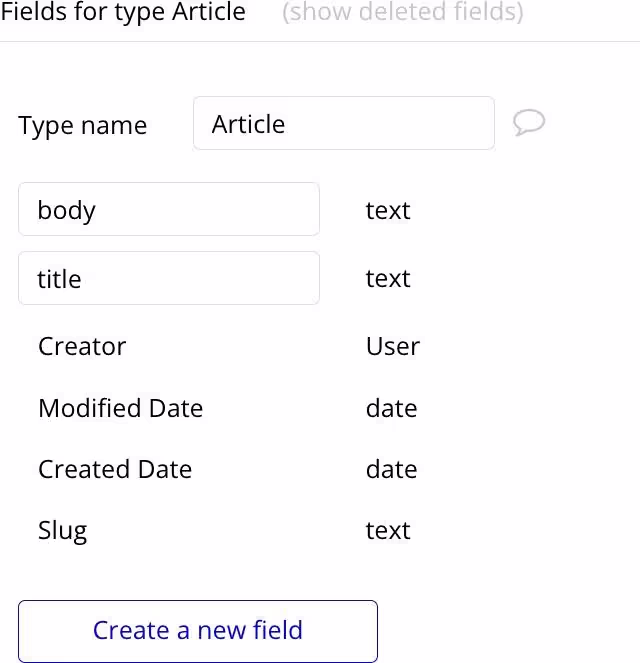
type Article in Bubble:
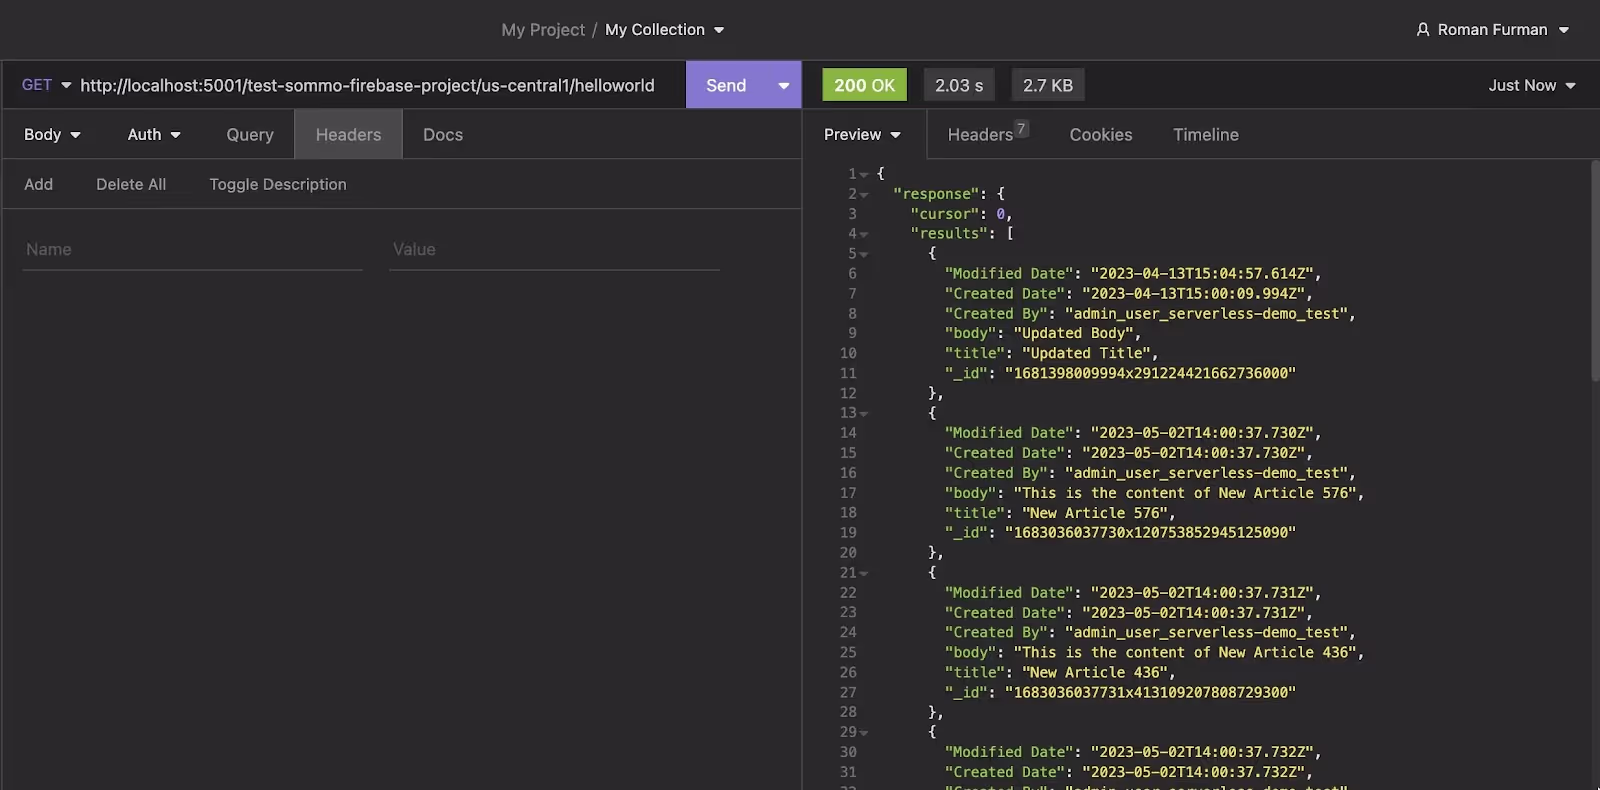
Example of fetching all Articles:
This code just simply fetches data from Bubble and returns it back (kind of proxy):
Get Bubble Things with Constraints
BubbleConstraintsBuilder.js contains a simple class named ConstraintsBuilder which will help you to build Bubble Data API constraints
We’ve added just 2 new lines of code:
Here a result of calling it:
Create Bubble Thing/Things
For this example, I’ve cleaned up our Articles database.
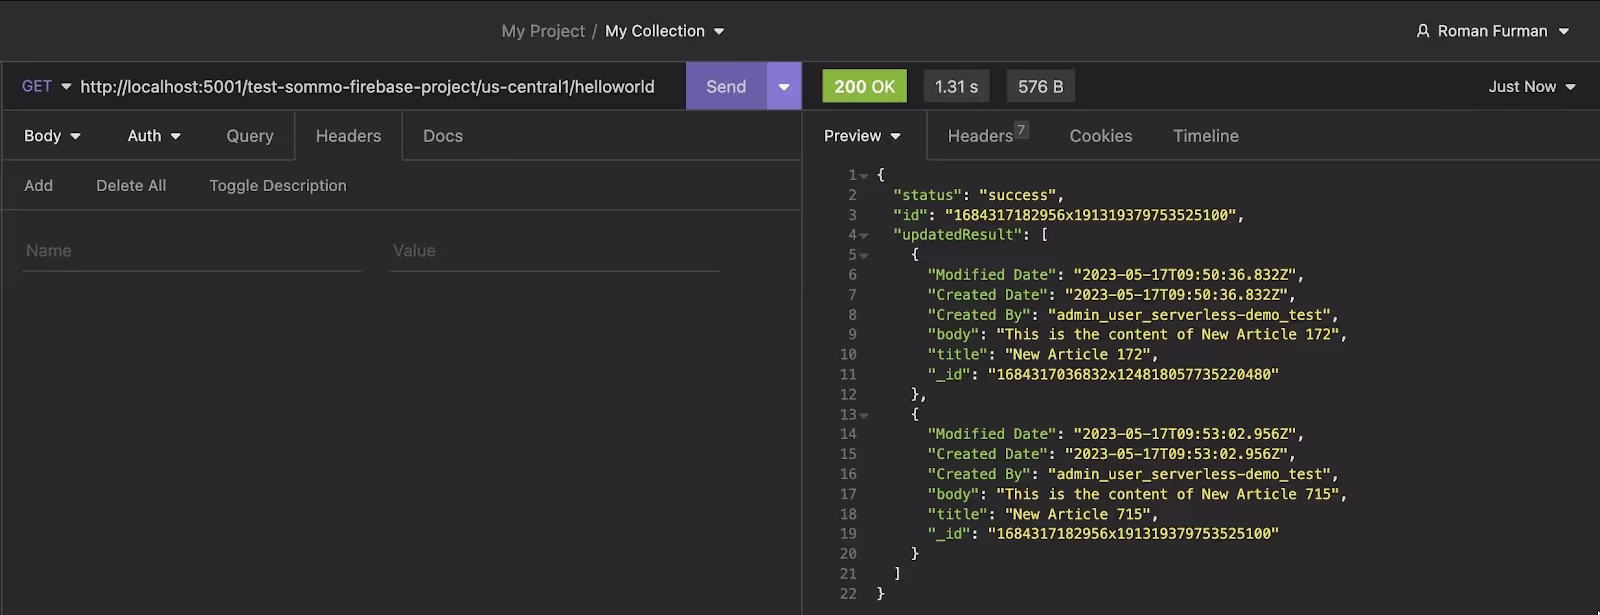
Let’s create a new article:
In this code, we’re creating a new article, calling
method, and passing type + newArticle object. After that, we’re fetching
to get an updated snapshot of the database:

In this response, Bubble returns the status of the object creation process “success” and the object’s unique id.
updatedResult field is an array of allThings (It contains only one object cause we’ve reset our database.
If you create one more, it will look like this:
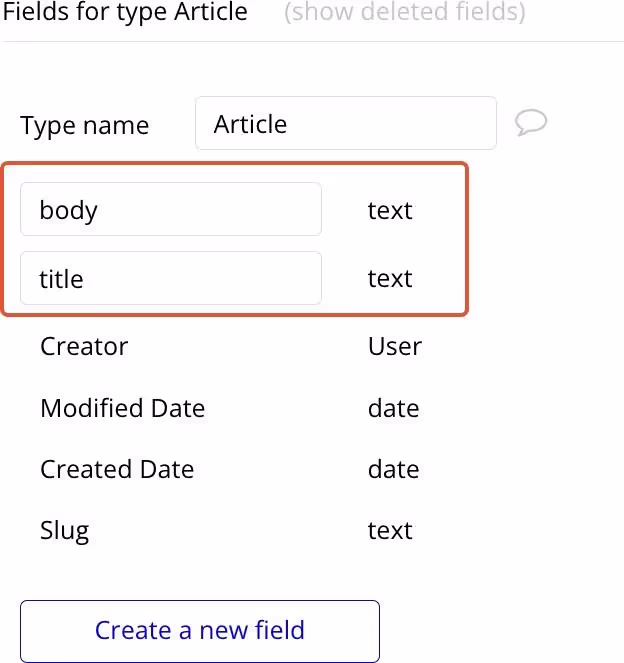
When you’re creating a new object of your type, make sure to provide values in all required fields. BUT not for Bubble’s default one: Creator, Modified Date, Created Date, and Slug (Bubble will generate these fields on their own)
I think you also noticed a generateRandomArticles function, don’t worry; it’s just a helper function that generates a number of random articles object depending on the count argument.
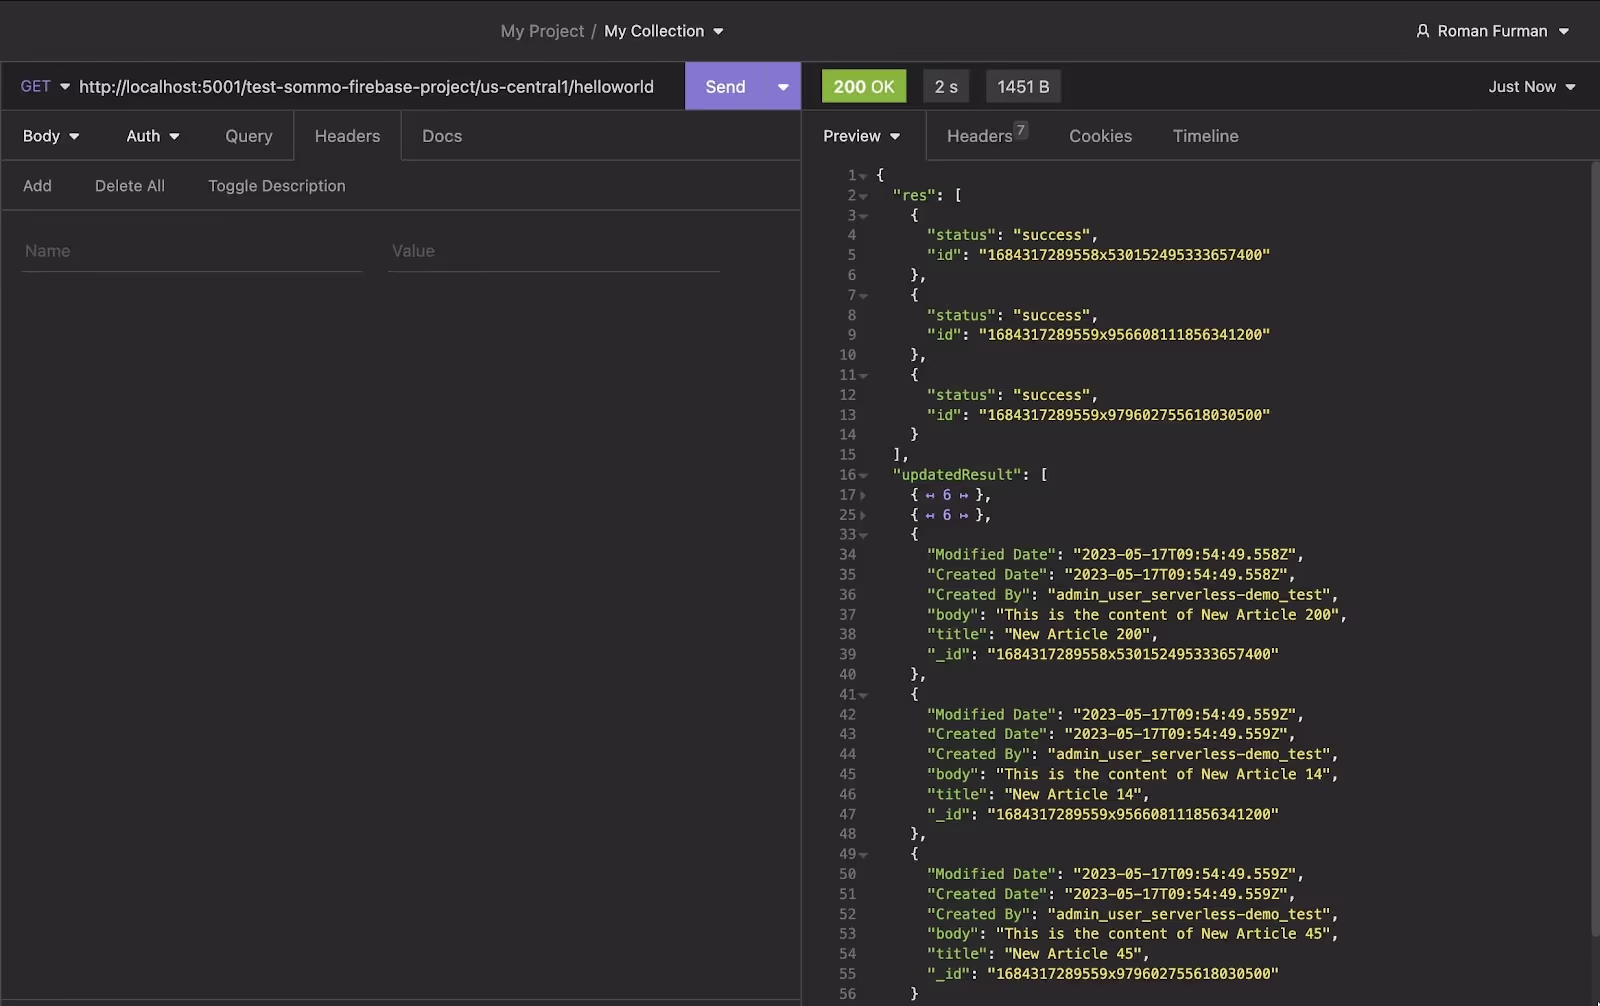
Create 3 new articles:
Result:
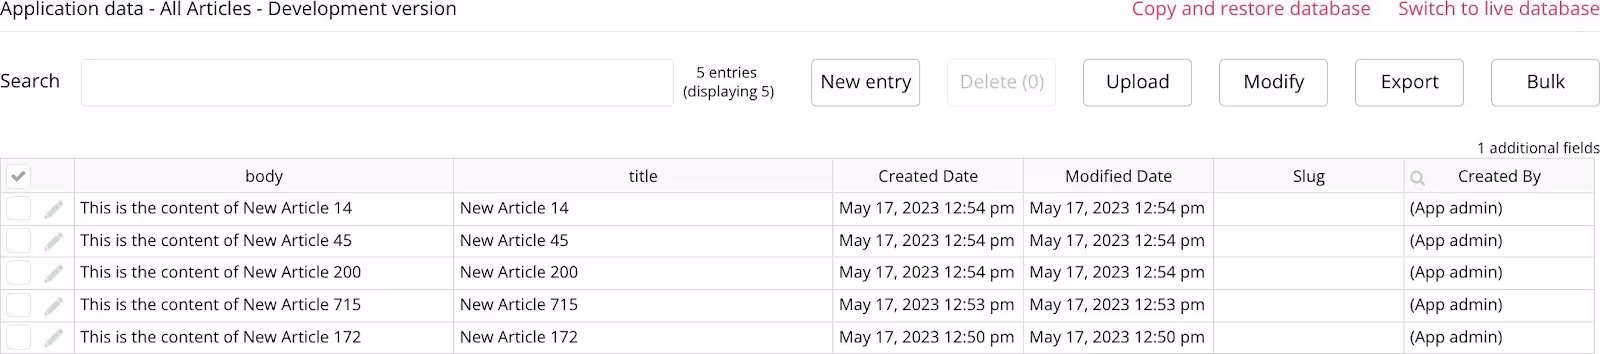
Now we have 5 objects in our database:
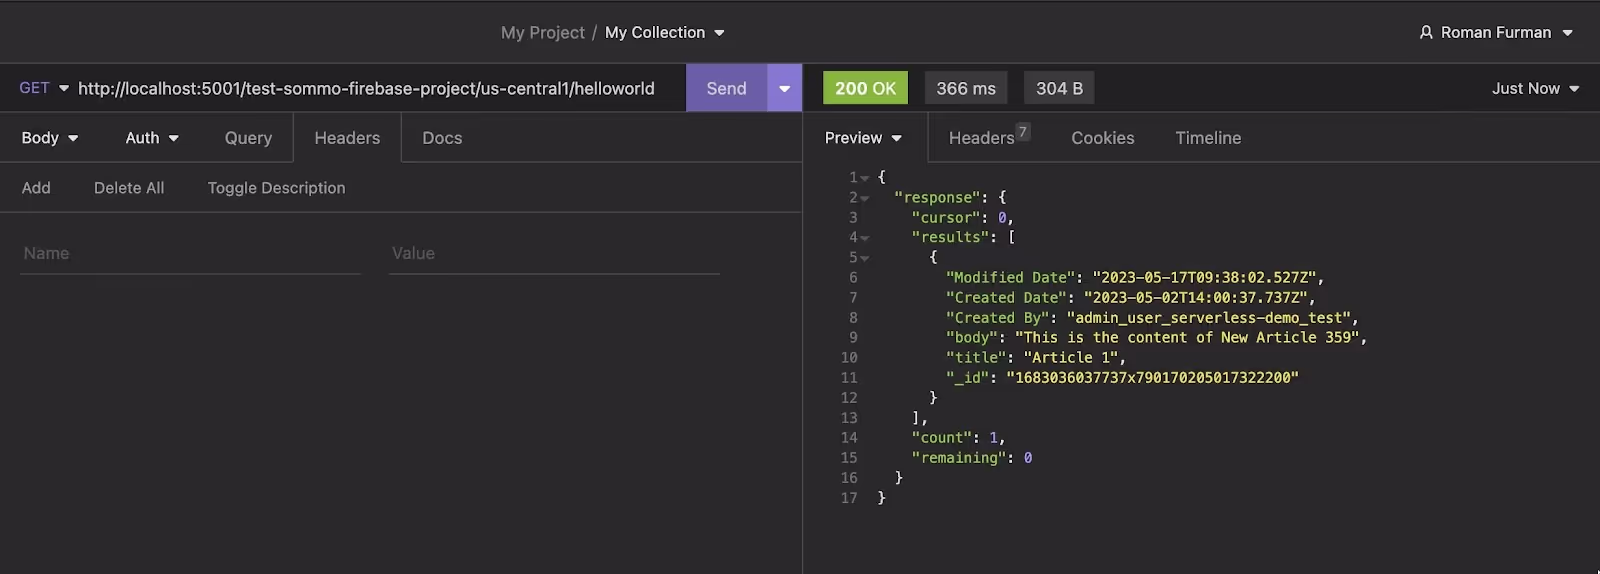
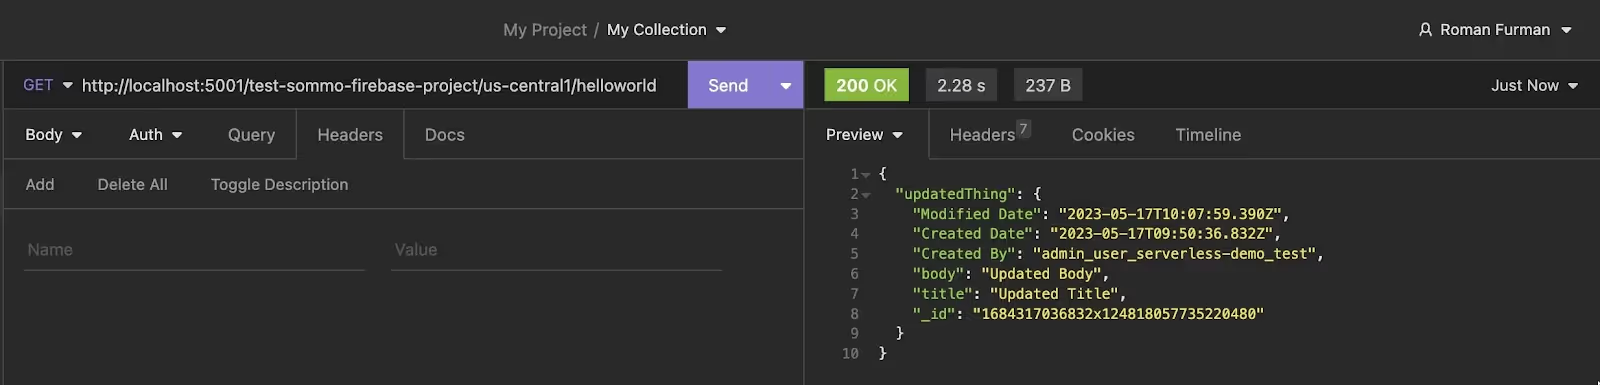
Update Bubble Thing
What’s happening there:
- Fetching all Articles;
- Selecting a first thing and updating “title” and “body”;
- Fetching article by unique id to see if changes applied.
Result:
And that’s pretty much it! All the resulting code you can find in the public Github repo. I will leave a delete method for homework.
Outro
In today's brief tutorial, we've taken important strides in understanding how to create and set up Firebase Functions to work seamlessly with the Bubble Data API. The applications of this knowledge are vast and varied. Whether it's chaining network requests, mapping data, performing calculations, or cleaning up the database, the possibilities are virtually endless.
Remember, the journey of learning and innovation never ends, especially with the current progress of AI technologies. So, keep exploring, keep experimenting, and most importantly, keep creating. The next big breakthrough could be just around the corner.


