


.avif)
Welcome to the ultimate guide on Webflow optimization, where we delve into the essentials of enhancing your website's performance on the Webflow platform. This guide provides valuable insights and practical steps to optimize load times, improve user engagement, and boost SEO through efficient Webflow optimization techniques.
If you prefer video content, here’s a tutorial from our Youtube channel.
Why speed is important
When you start working on the new site, the site speed is rarely on top of your mind. However, when the design and content are finalized, the question of site performance becomes acute.
Having a performant website is important for many reasons:
- It provides a better user experience. No one likes to wait a few seconds for your site to load.
- It improves the conversion rate. Whatever your Call to Action is, visitors are more likely to complete it if your site is fast and responsive. It also improves all the other website metrics (bounce rate, retention, etc.)
- Search engine (Google) rank your website higher. And thus bring more free visitors.
These are not just my words; they are backed by numbers.
You can use different approaches and metrics to measure your site performance. We’ll use the most common one: Google PageSpeed Insight (PSI) metrics, which they introduced as early as 2009 and started applying as a factor in the site ranking.
How to measure speed and performance
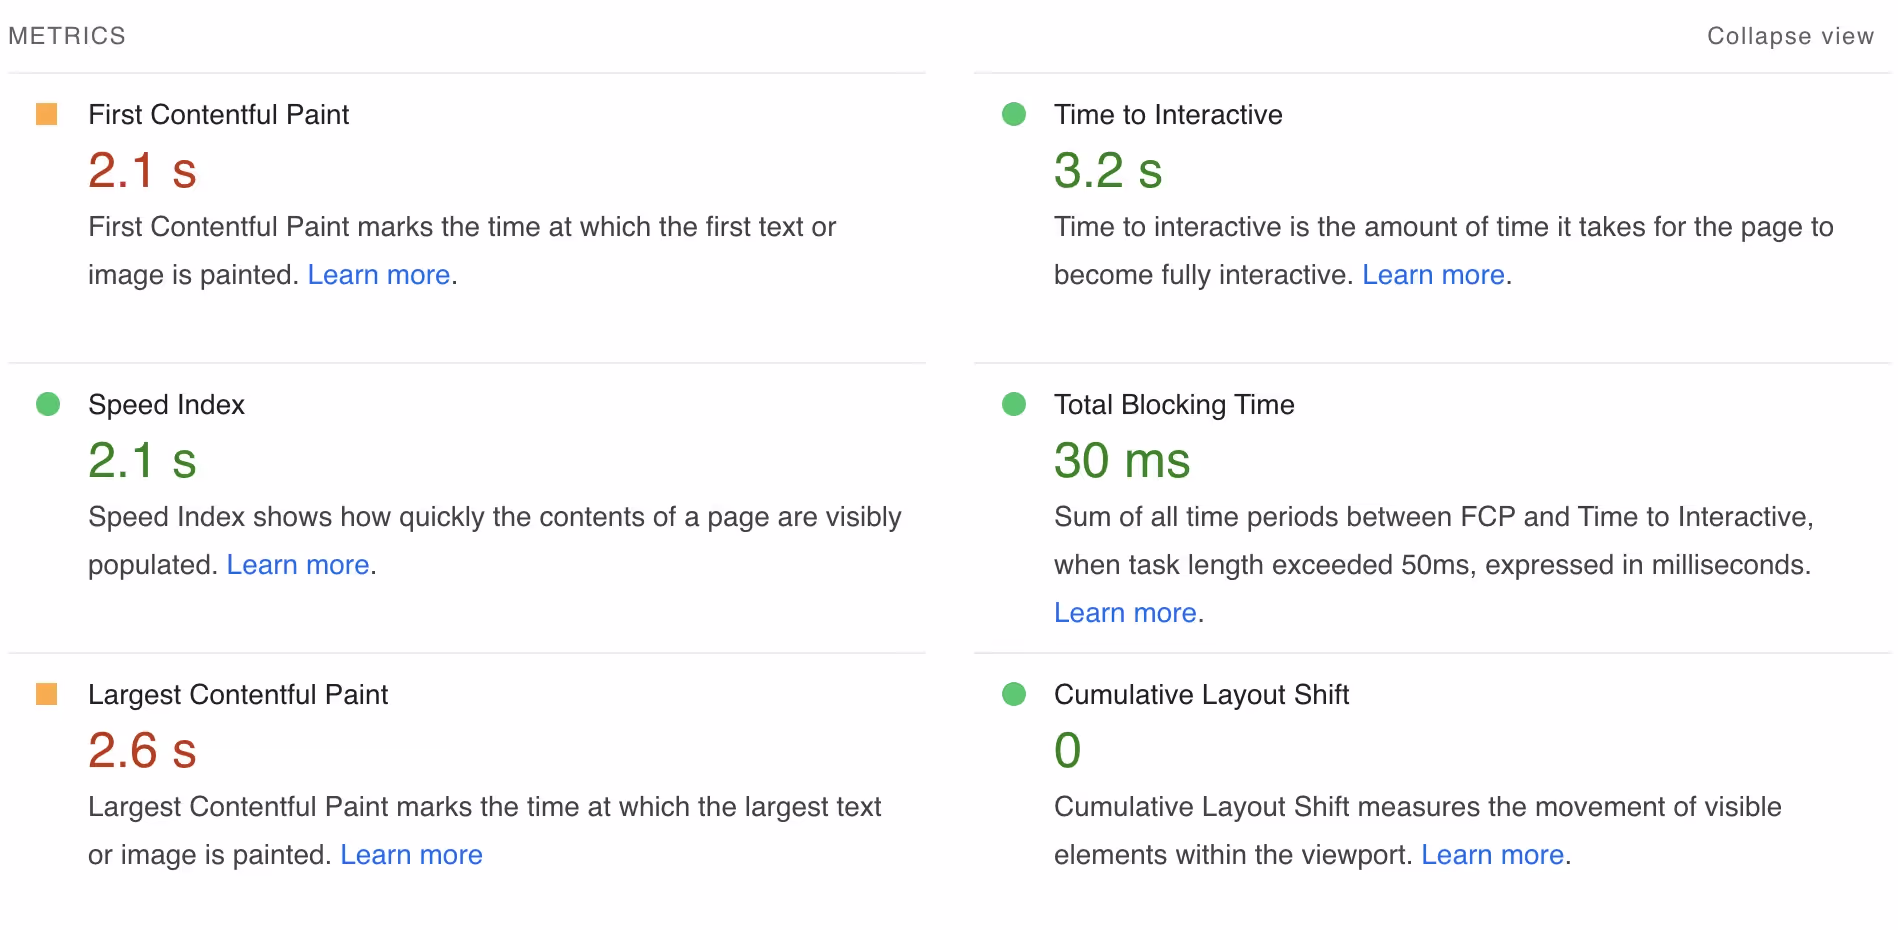
Google uses the tool Lighthouse to measure and report on the PSI site the following metrics of the website:
- First Contentful Paint (FCP).
- Speed Index (SI).
- Largest Contentful Paint (LCP).
- Time to Interactive (TTI).
- Total Blocking Time (TBT).
- Cumulative Layout Shift (CLS).
Each metric has a ‘weight’ from 10% (FCP) to 30% (TBT). You can play with the performance calculator here.
On the PSI site, you’ll also see the ‘Core Web Vitals Assessment’ (the average of the metrics computed over the previous 28-day collection period). Core Web Vitals include some Lighthouse metrics: (FCP, LCP, CLS); and some new: First Input Delay (FID), Time to First Byte (TTFB), and Interaction to Next Paint (INP).
Lighthouse metrics are more important for us right now. And we’ll be focusing on the mobile metrics, cos if you get mobile metrics right, desktop ones will be taken care of.
You can also measure site performance by running Lighthouse through the Chrome Console Dev tools, and select more options of what you want to measure on your site. And it’s better to run the analysis in the “Incognito” mode, to avoid any plugins interfering with the test.

Let’s see how to achieve the best results with the Webflow site.
Webflow default speed optimization features
Not surprisingly, Webflow has many optimization features working out of the box. They deliver your site and assets through the Content Delivery Network (CDN). You can enable HTML/CSS/JS code minification (don’t forget to do it).

Webflow uses Responsive images to automatically resize your images for different screen sizes (through added “srcset”). It doesn’t mean you can stop paying attention to the image sizes, but it’s very useful and handy.

Webflow generates and stores static pages for your CMS collection items, lazy loads images by default, etc.
However, you’d need to do much more than that to create a snappy website. Let’s get to them.
1. Third-party scripts optimization
Third-party scripts are probably the number 1 cause of bad site performance. And it will be most likely the number one recommendation in your Lighthouse / PSI report.
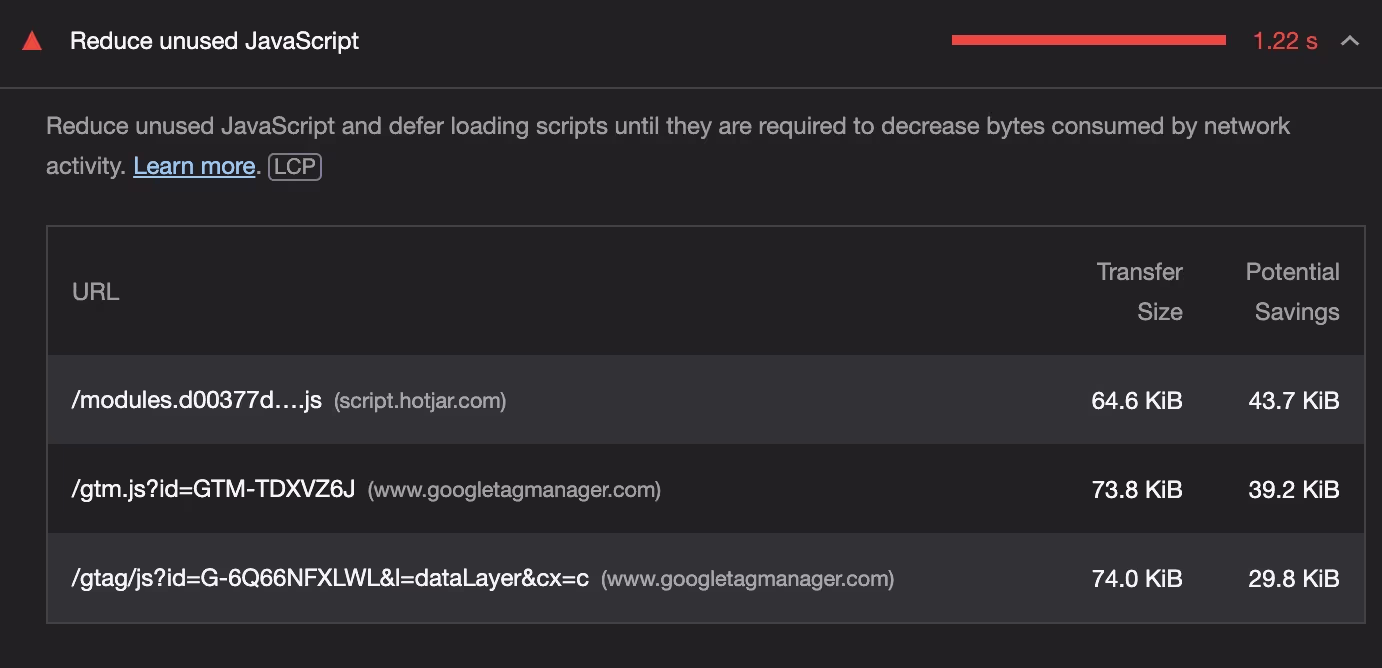
Unfortunately, no modern production website can get away without any scripts. You’d need at least 2-3 analytics and likely at least one ad library on your site. Here’s what you should do.
1.1 Leave only necessary scripts on each page
Carefully analyze all the scripts you use, and discuss with the stakeholders and your team what is absolutely necessary and what can be removed. Most likely, you have some remnants of the old analytics or styling effects lib that are no longer needed.
Ensure that the script is added only to the page where it’s used. A common mistake is to add a JS effect library that’s used on a single page to the global footer, which makes it load unnecessarily on all the other pages.
Leave in the global footer page only scripts that are used on every single page (like analytics, fonts, etc.)
And make a policy to test any new script through performance analysis before adding it.
1.2 Move to before </body>
Move scripts from “<head>” to “<footer>” before the closing “</body>” tag. When rendering your site, the browser parses the page from top to bottom. Lowering your scripts on the page will allow users to see the content first.
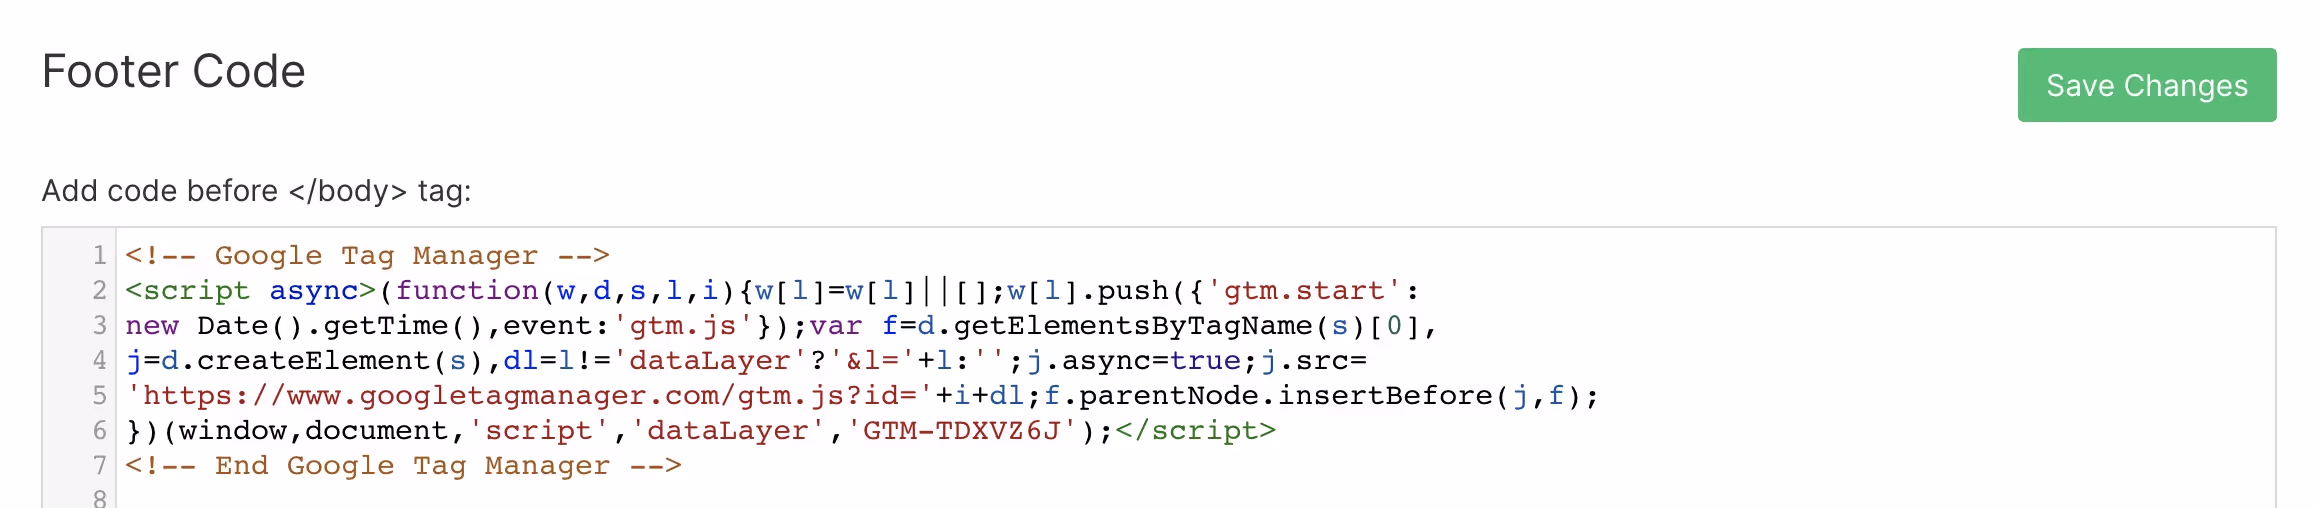
And don’t worry that most official docs tell you to put the scripts in the “<head>” section. They will be perfectly fine before the “</body>” as well.
1.3 Use “async” or “defer”
When adding the “<script>” tag, you have an option to use “defer” or “async” attributes.
With the “async” tag, the script will be fetched in parallel to parsing and evaluated as soon as it is available (meaning the DOM can be not ready at that time). It’s useful if the script doesn’t need to access any DOM elements and if you don’t care about the order of the execution (like most analytics).
With the “defer” tag, the browser will also load your script in the background but start executing it only after the page is rendered. It’s useful if you need to manipulate the DOM elements or when order is important (like JS animation libs).
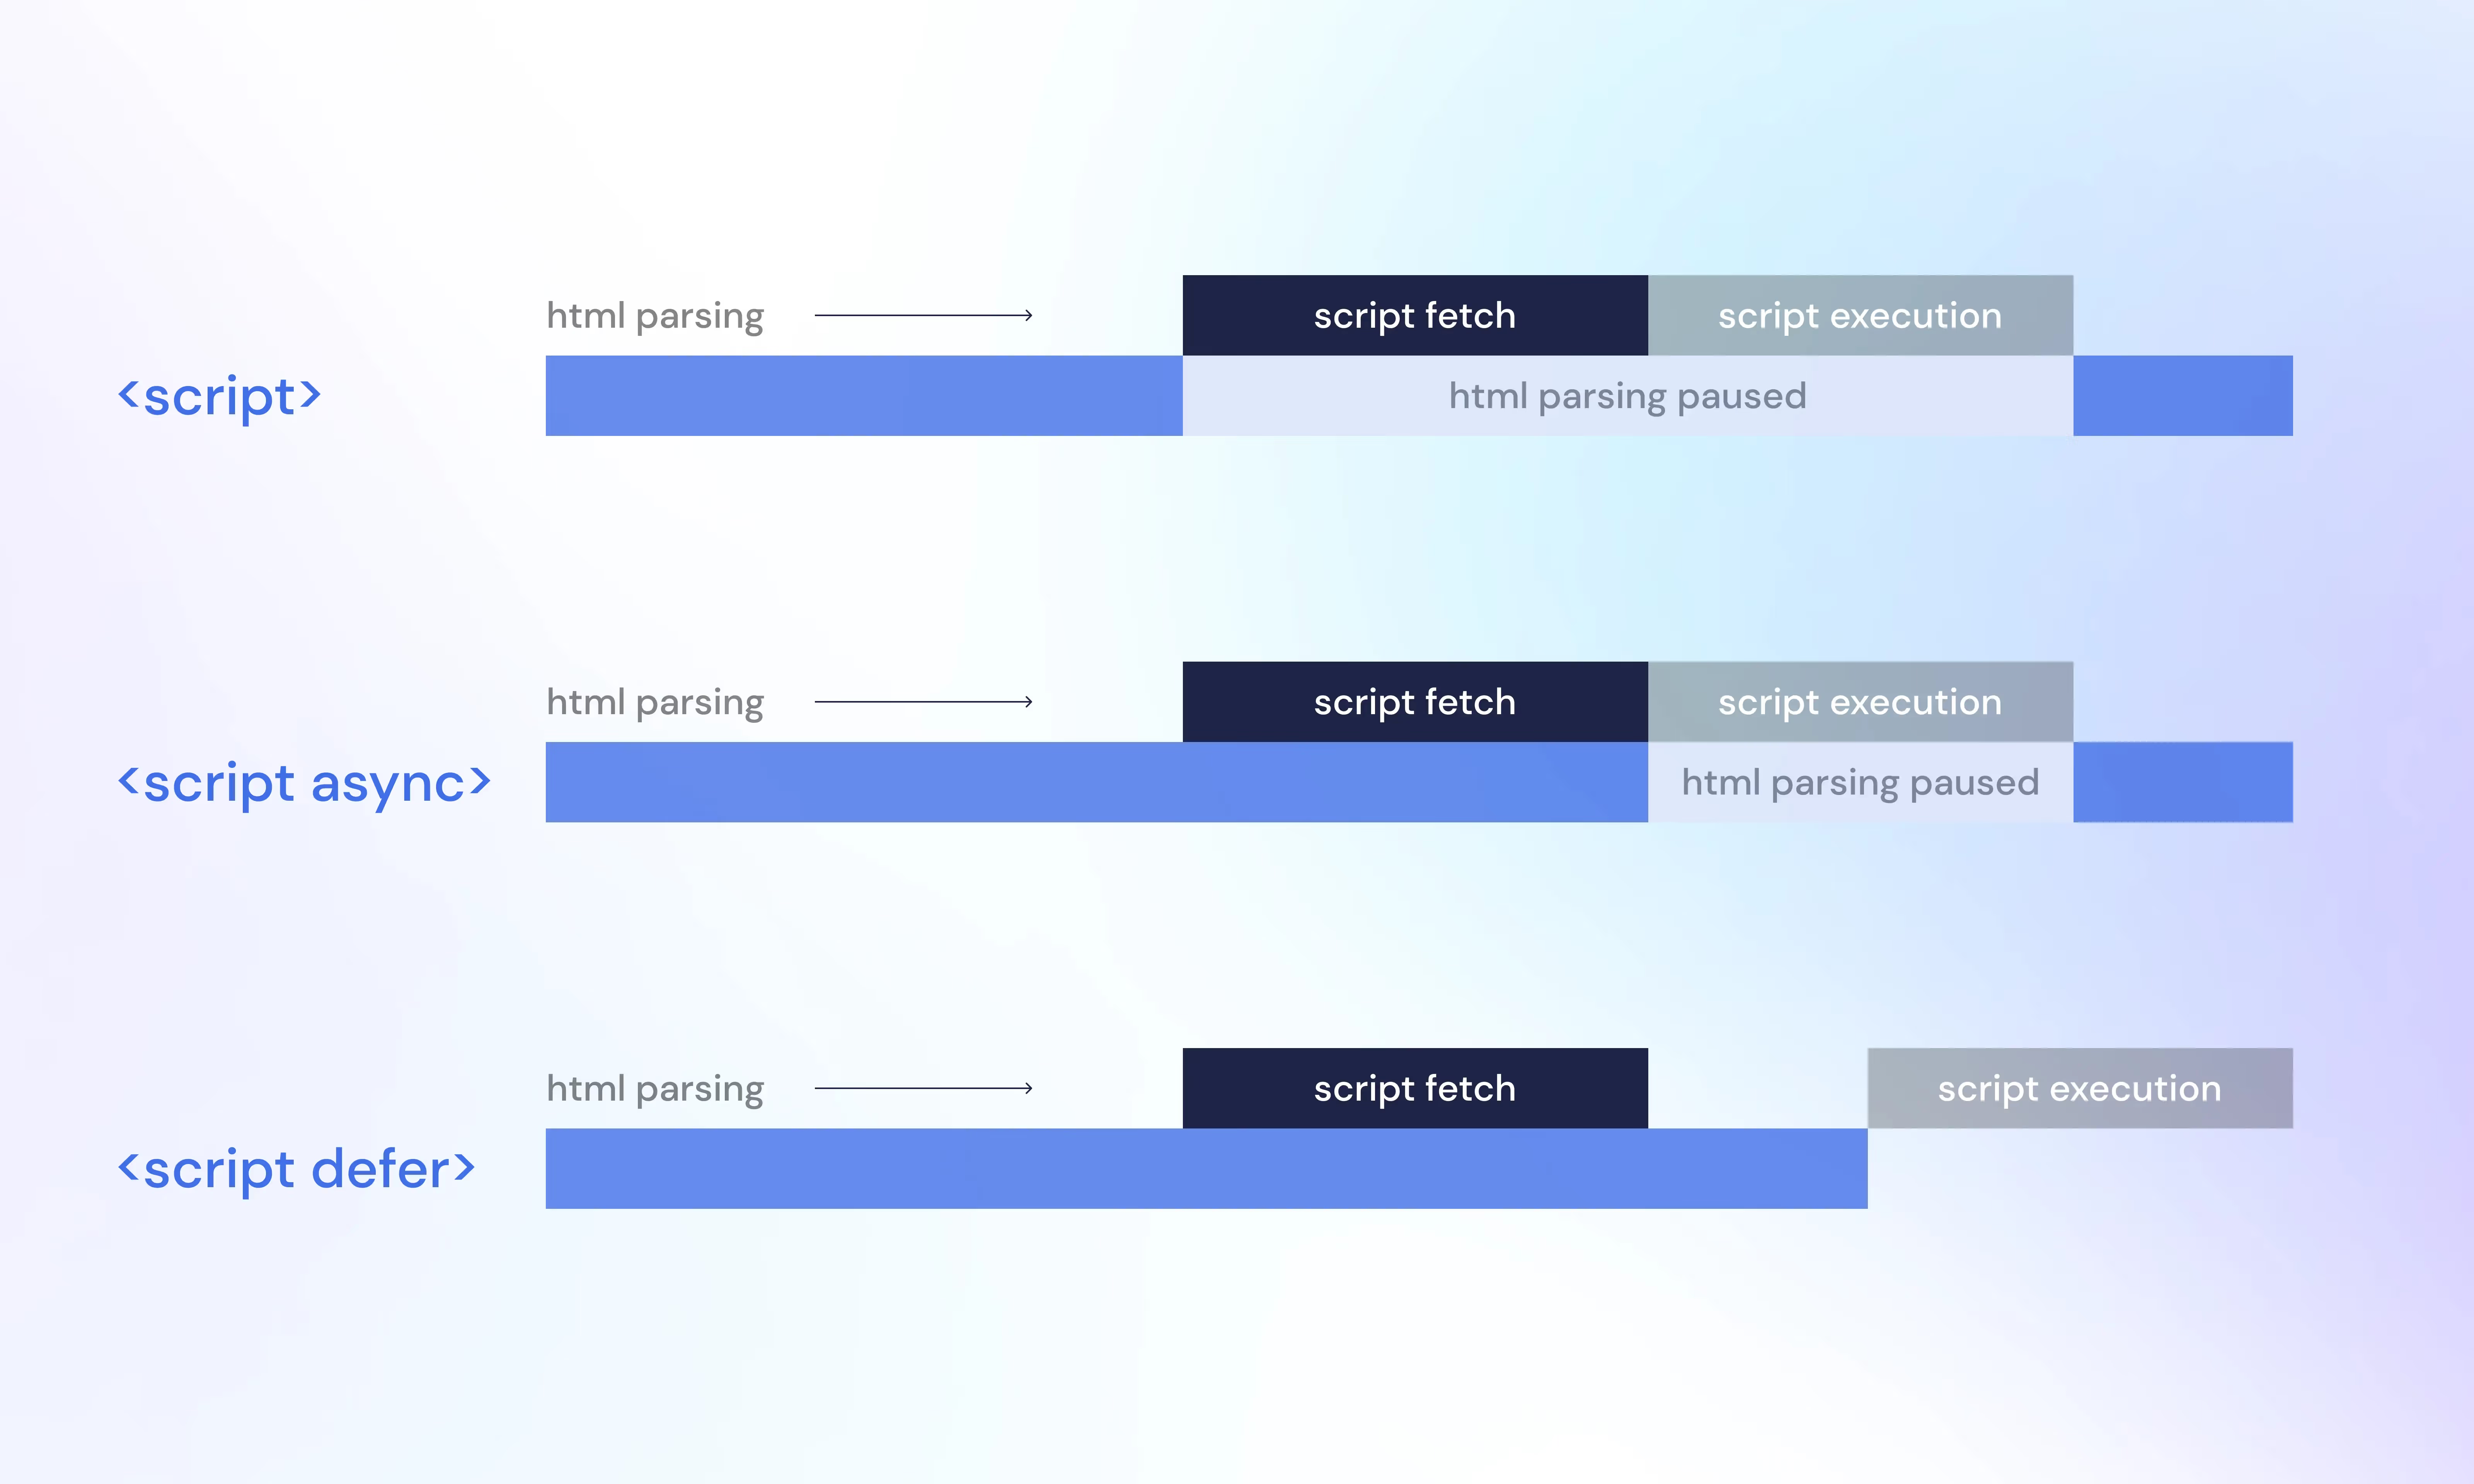
It’s not always apparent if “async” or “defer” would be better in each case. Try both options, and see the results. In practice, for most of the scripts, I use “async”.
☝️ For this reason, I never use Google/Facebook setup options in the “Integrations” tab, cos you cannot control where these scripts will be placed and if they’ll use async/defer or not.
1.4 Embed the code if small
Sometimes you’d just need a small piece of code to extend the functionality of your site. Even if the script is very small (a few KB), having it as a <script> tag would be very costly, cos the browser would need to establish a connection with the hosting, download it, and only then execute it.
If the piece of code is small, just copy-paste it on your site. For example, like in this “cookie-banner” lib.
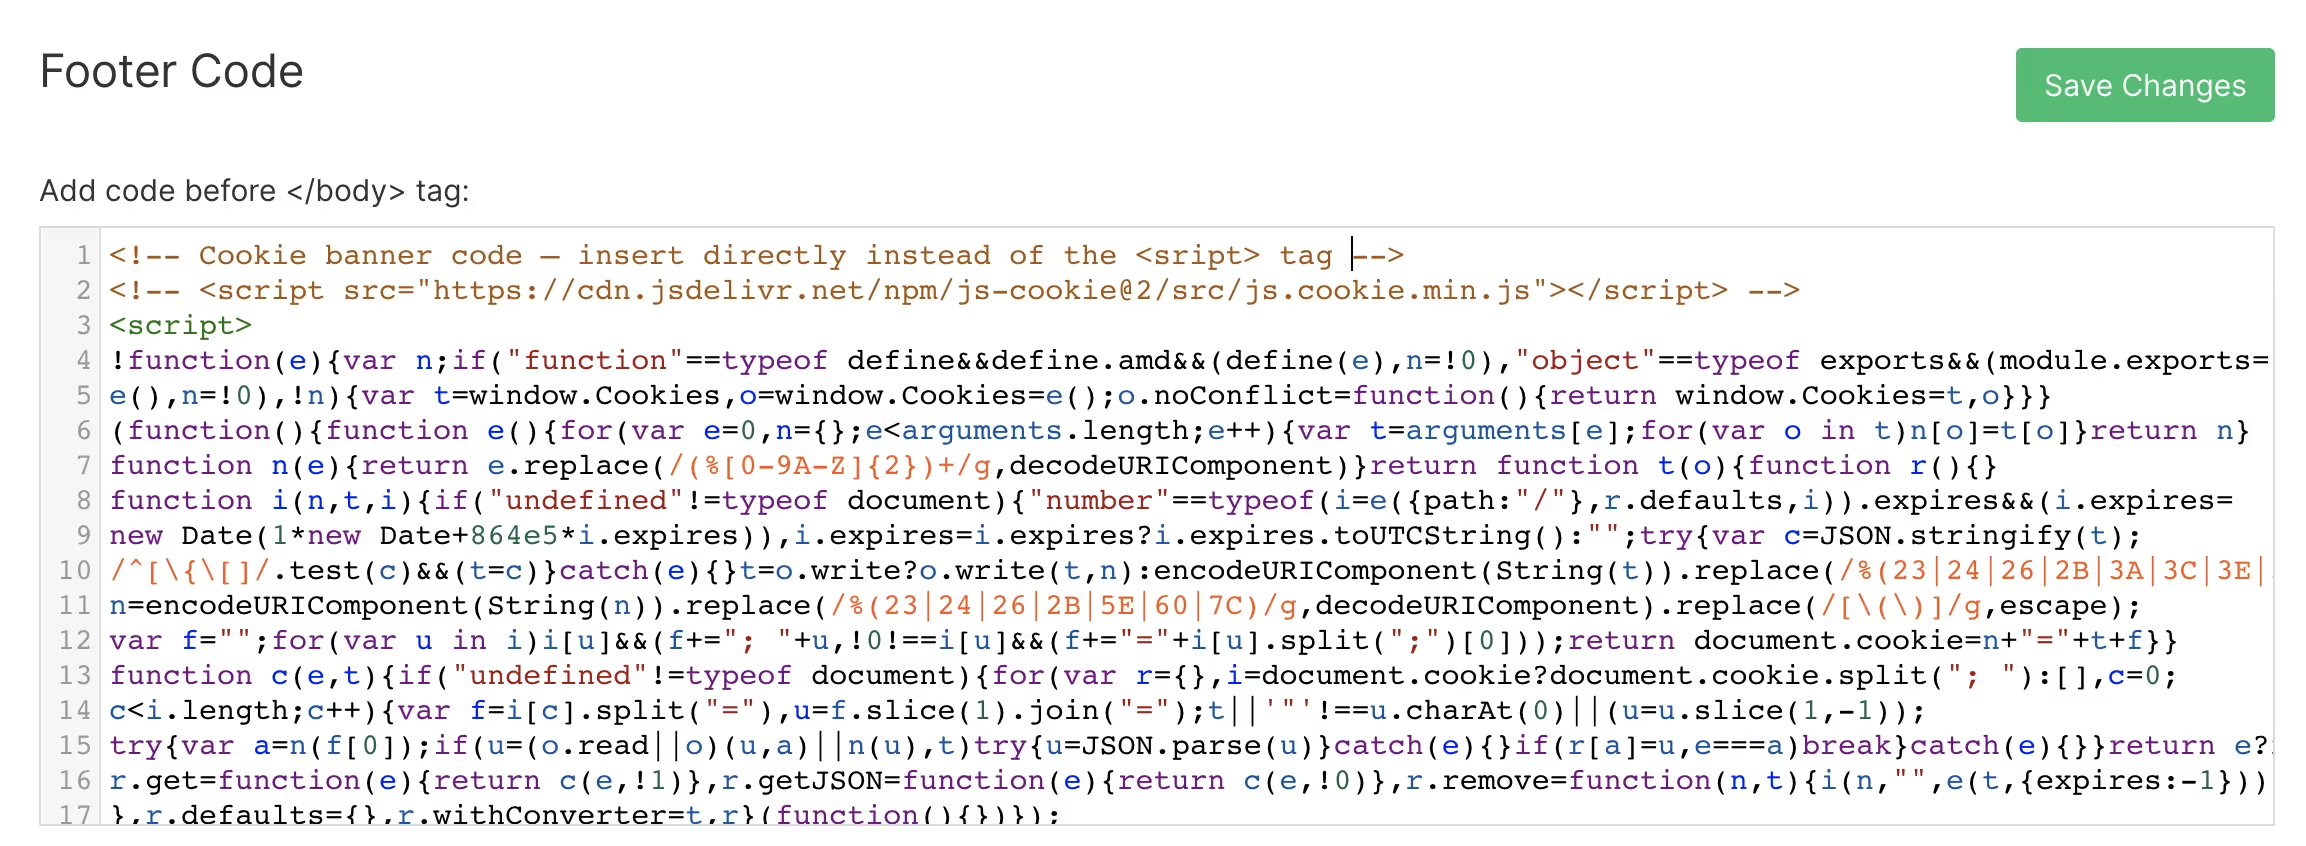
☝️ Note: don’t do it for bigger libraries, cos your initial HTML size will become very big. And Webflow has a limit of 20,000 characters in the “Custom code” section.
1.5 Delay the script loading with “setTimeout”
If the script is not critical but still useful to have — delay the loading of this script for a few seconds with the “setTimeout” function. Here’s the example:
I do it for customer support chat software, for analytics like Hotjar, or some other non-critical scripts. Of course, your users might notice that the “chat” bubble does not appear instantly, but I’d say it’s acceptable for 99.9% of the cases.
☝️ Note: don’t do it for core analytics, like Google Analytics or Amplitude, because your metrics won’t be accurate.
1.6 Load scripts conditionally
There are cases where you don’t need scripts all the time, but only when specific conditions are true. For example, if you don’t run remarketing campaigns, your ad scripts are not always needed. You can add conditions that these scripts are loaded only when the user comes from the ad campaign (with url parameters like “fbclick”, “gclid”, or “utm_source=google”). Here’s an example with Segment:

That way you’re still able to track your ad conversions, but don’t load these heavy scripts when not needed.
1.7 Use “preconnect” or “dns-prefetch” for required origins
Lighthouse might give you recommendation to “Preconnect to required origins”. Add to “<head>” the following tags:
<link rel="preconnect" href="https://assets.website-files.com">
<link rel="dns-prefetch" href="https://assets.website-files.com">
These tags tell the browser to establish an early connection with another origin, and that you’d like the process to start as soon as possible. Establishing connections often involves significant time in slow networks. Taking care of all this ahead of time can make your application feel much snappier to the user without negatively affecting the use of bandwidth.
You can add “preconnect” not just to Webflow assets origin, but to other origins where you load any assets as well.
☝️ Note: don’t add “preconnect” to every external origin because it might slow down the site rendering as this process still takes precious CPU time. And if you don’t use this origin for 10 seconds, the browser will close the connection, thus wasting all the work.
In practice, I add “preconnect” to 2-3 most important origins (Webflow assets, fonts, libs, etc.)
2. Fonts
Fonts are an important part of almost every website. Unfortunately, as of 2022, the default implementation in Webflow is done very poorly. Below is what you should do.
2.1 Minimize the number of fonts
Make sure you use a limited number of fonts on the page. 1-2 should be enough for the majority of sites and pages. If the designer really-really wants a very custom font for that button … just don’t do it and explain how it would ruin the user experience with extra lading time…
If possible — use system fonts (like Arial, Helvetica, etc.). If the absolute top site speed is your goal — you should definitely use system fonts and not load any extra.
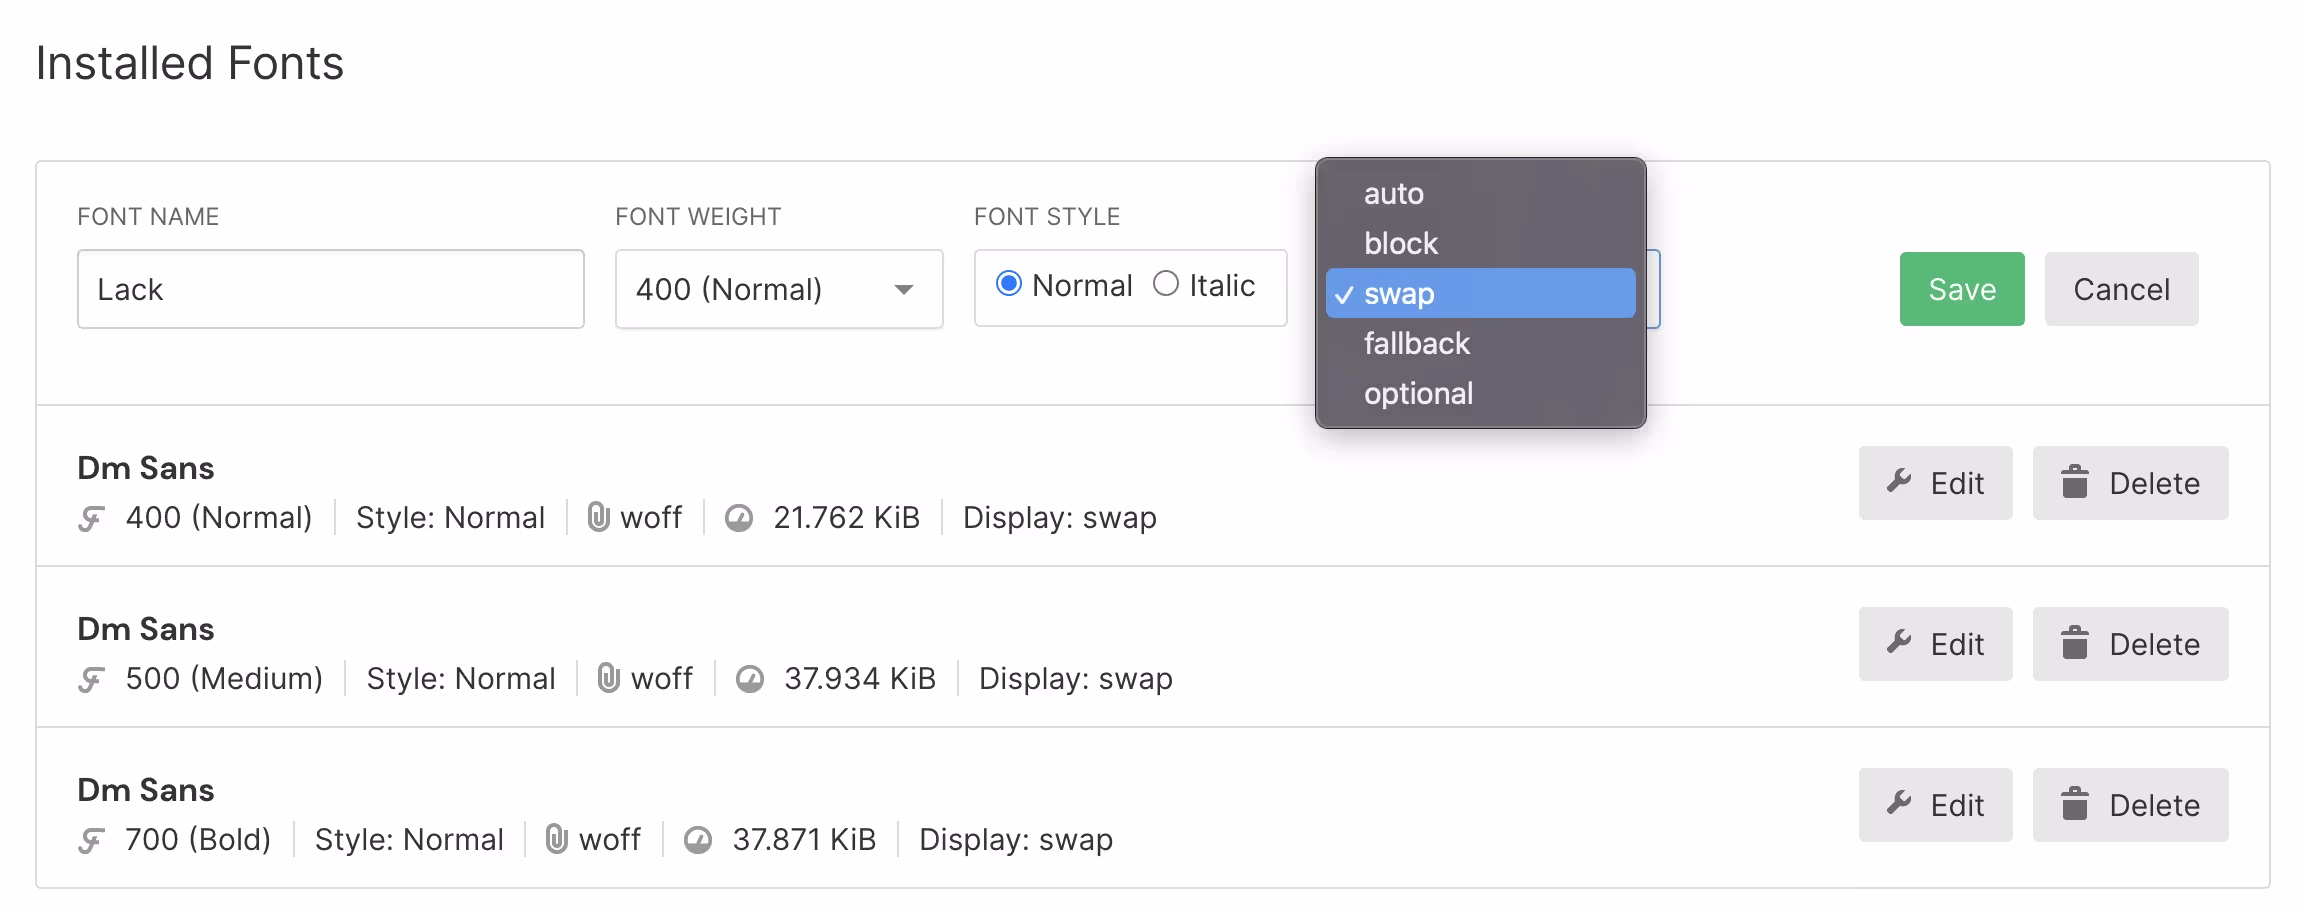
2.2 Upload fonts manually with “swap”
Remember a simple rule: NEVER use the default Google or Adobe fonts from the drop-down menu in the “Fonts” section. They are loaded in the worst possible way, and Lighthouse wouldn’t like it at all.
Instead, download all the font files, and upload them manually in the “Installed Fonts” section with the “swap” setting (the best-performing option). I hope Webflow fixes this in the future.
2.3 Preload fonts with code
For absolute top performance, you’d need to pre-load your fonts. Since the font source is located in the CSS, even the custom fonts start loading only after the CSS file is loaded and parsed. We can tell the browser to preload the font files earlier. Here’s an example with Google fonts (you can do the same with fonts loaded to Webflow). It uses also “preconnect” (see above).
Learn more about this approach and how it works in this article from CSS-Tricks.
☝️ Note: loading fonts from the external origin with code will disable an option to select this font from the drop-down inside Webflow. That’s why you’d need first to upload the font, select it in the drop-down for all necessary classes, then delete it and load it with code. Yeah, it’s not too easy.
3. Images
Images are often among the heaviest assets on the page. Getting them right is crucial for a snappy website. Webflow helps with the Responsive images feature, but it’s not enough.
3.1 Compress all images and use WebP
The obvious (but often neglected) step is to go through all your images and compress them. There are a lot of free resources (like TinyPNG, Squoosh) that can significantly reduce the image size.
In 2022, Webflow finally started supporting the WebP image format. And even added an automatic conversion tool to WebP inside Webflow. Make sure to leverage it.
☝️ Note: Webflow compression tool does not yet work inside CMS. So you’d need to convert to WebP and compress images there manually.
The majority of your images should be in WebP format now. They support transparent backgrounds and are extremely low-weight (sometimes it feels like magic, WebP can reduce the image size up to 95% compared with the same image in PNG/JPG formats).
3.2 Lazy load images
Ensure all your images below the first screen are set to lazy load. It’s great that new images are set to lazy load by default in Webflow.
However, if the image appears on the first screen, no need to lazy load it, since it will only delay the total load time.
3.3 Do not use images as “background”
Never use images as the “background” of any element. Neither browsers nor Webflow can lazy-load or optimize these images, thus they are extremely inefficient when your site is loaded. Even SVGs don’t help here.
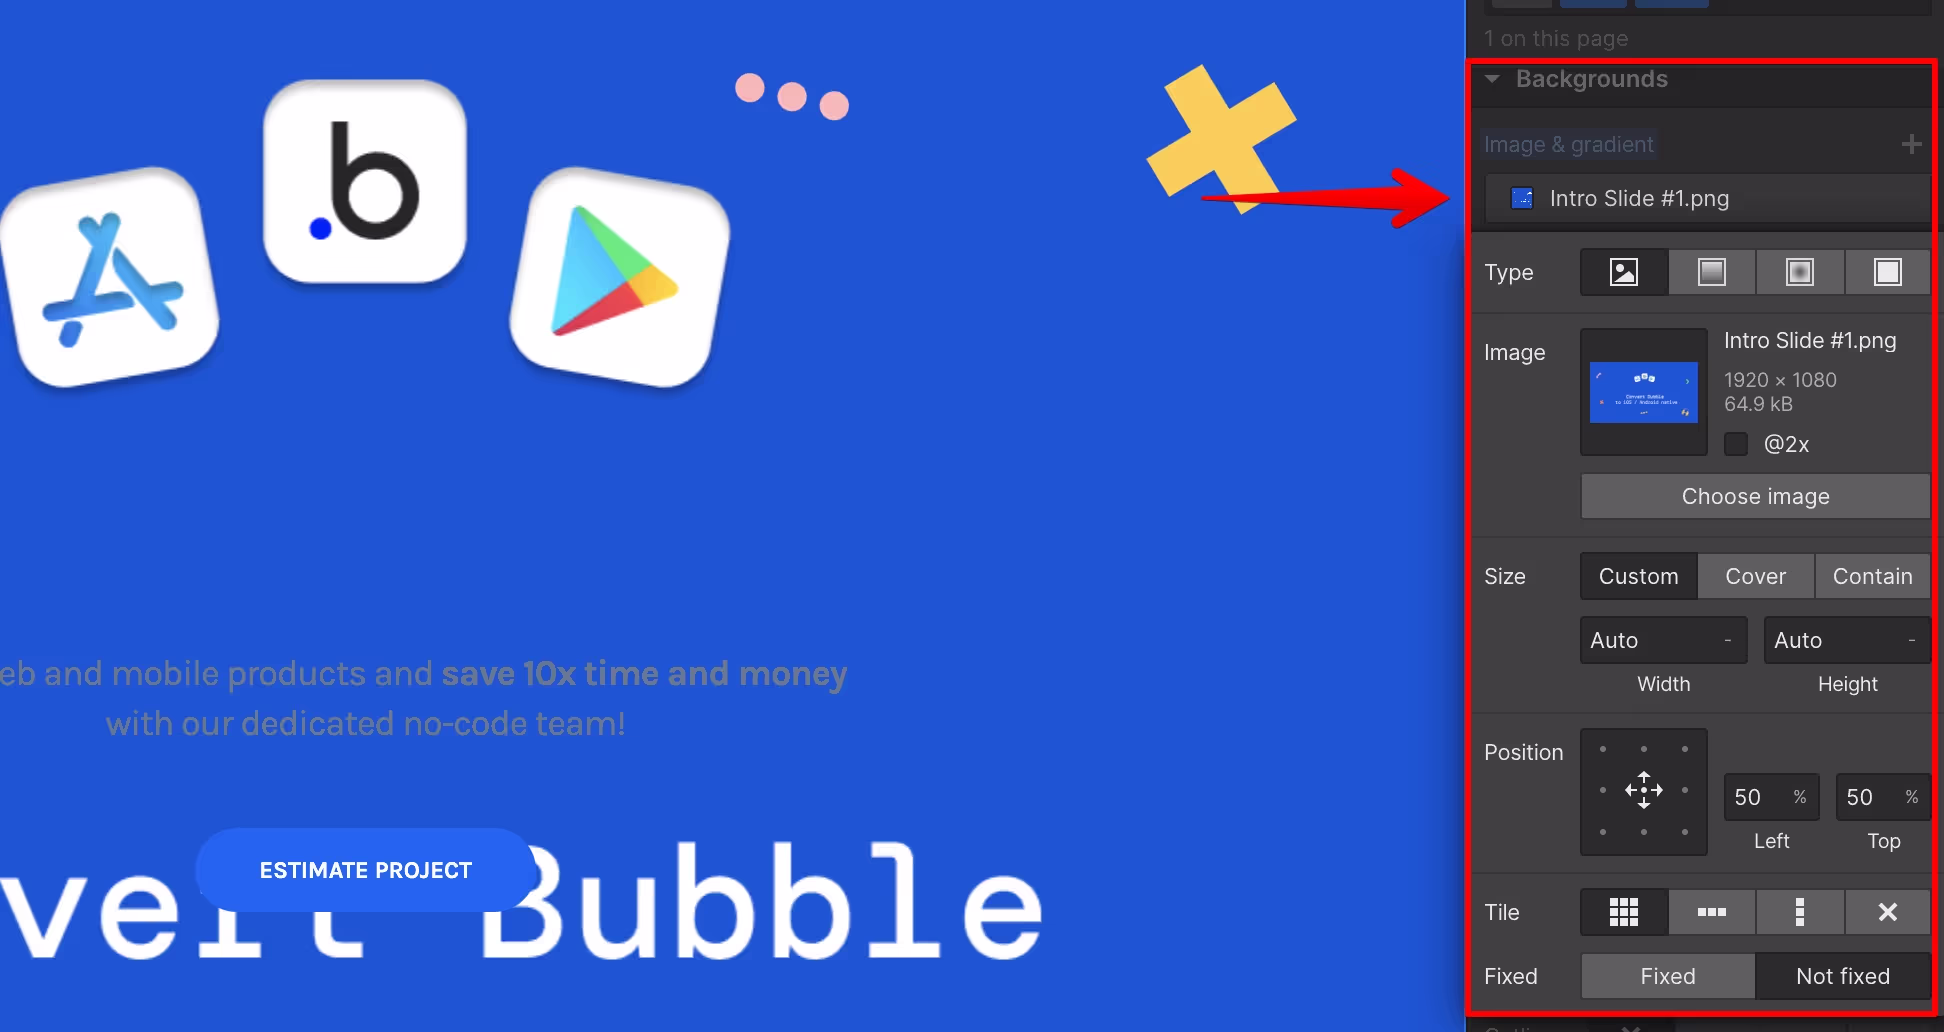
You can achieve the same effect with the regular <img> tag, positioned accordingly with the “object-fit” property.
Reserve backgrounds ONLY for colors and gradients.
3.4 Use SVGs where applicable
Make use of the SVGs for vector images. Most icons or simple forms can be replaced with SVGs. You can achieve great effects with line and path animation of your SVGs, as we did for our client https://uptech.team
☝️ Note: SVGs don’t always have smaller sizes. Make sure to check what’s better in each case: SVG or WebP.
3.5 Embed small SVGs directly
If SVGs are small, insert SVG code directly into the page (with the “HTML Embed” element).
That way, you’ll save the client from one more request for each SVG.
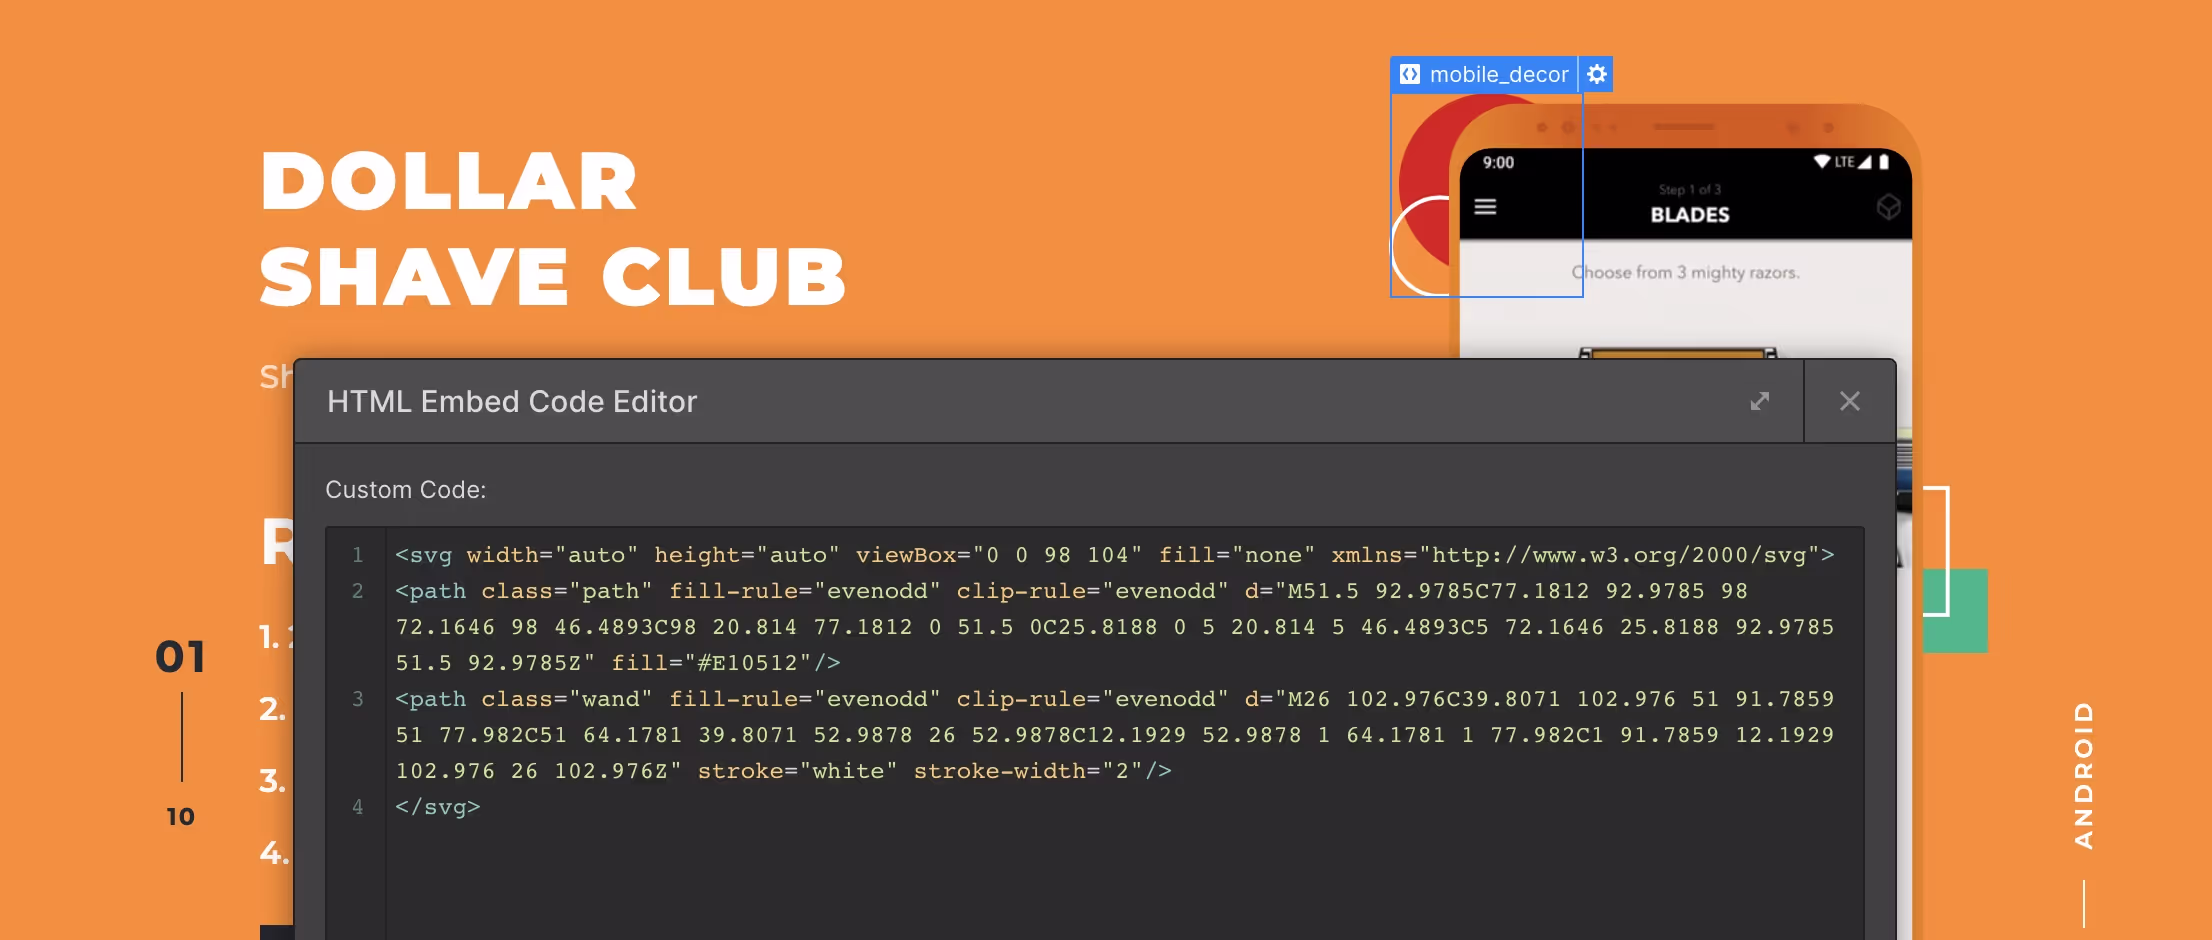
☝️ Note: Don’t embed big SVGs this way because then your initial page load will take longer. And Lighthouse will complain about the excessive DOM size.
4. Video
Webflow doesn’t make good friends with videos. Their automatic video transcoding can dignficantly decrease video quality (and there’s no option to disable it).
Also, many users complain that the resulting “optimized” and transcoded video file by Webflow can have an even larger size than the original (up to twice the size).
That’s why I avoid using native Video elements on Webflow, and prefer the Youtube element, or embed Youtube/Vimeo <iframe> directly where needed.

5. Site organization
There are many recommendations for your site organization that will help make your website smaller in size and more responsive to your users.
5.1 Clean up regularly
Make sure to regularly press “Clean up” in the “Style Manager”. When you remove elements or pages, it’s classes are not removed automatically (even if they are unused), and are still served with your CSS file. That’s why you need to manually go to the Style Manager and clean up unused elements.
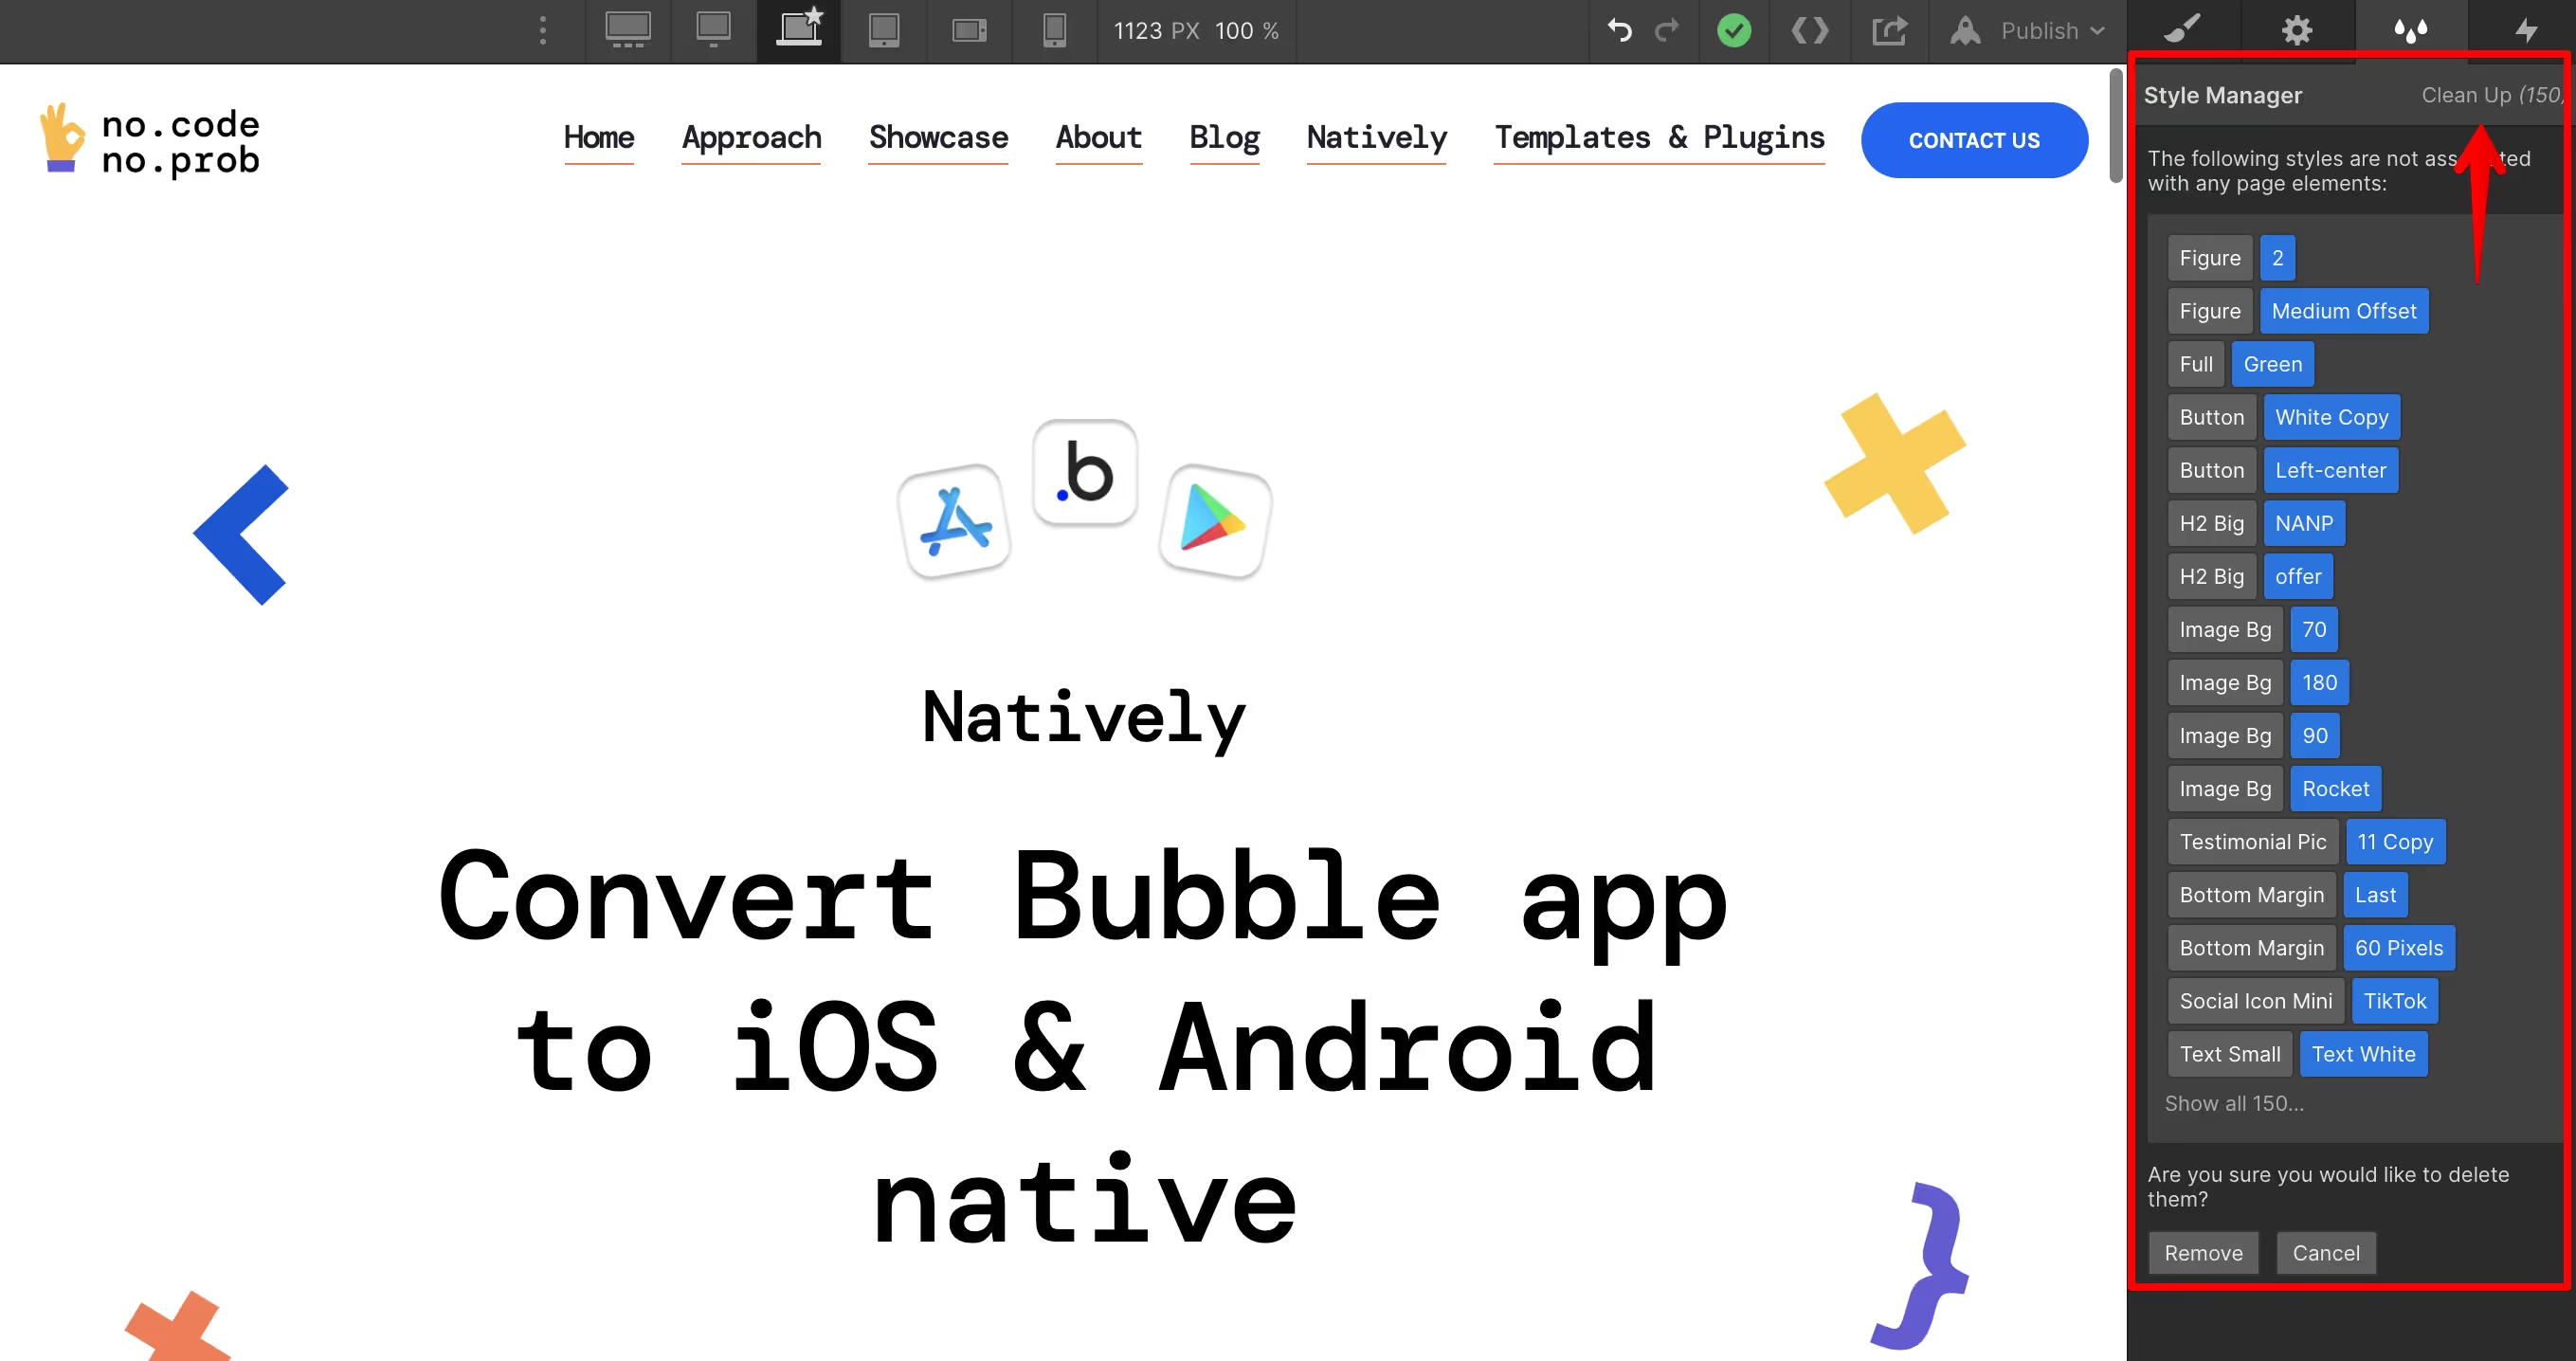
Also, don’t leave hidden elements on the page or unused pages in “Draft”. They tend to be forgotten about and stay there for years until someone finally notices them. Meanwhile, preventing classes from being removed.
☝️ Note: Don’t forget to also visit the “Interactions” tab and clean up unused animations as well.
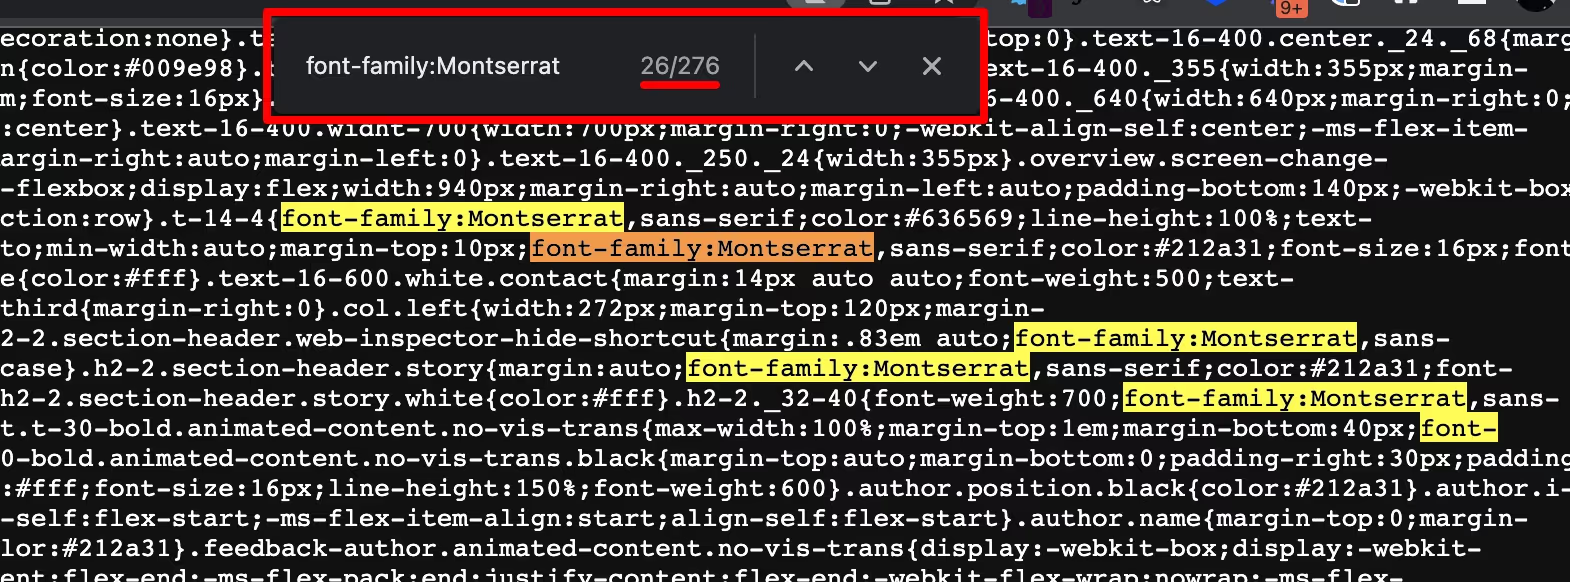
5.2 Set styles on the root level
Stick to the good development practices, organize your styles and reuse them wherever possible. It includes setting fonts, text sizes, colors, default paddings/margins, etc on the body or tag root level. I’ve seen so many times where in the resulting CSS the “font-family” is repeated hundreds of times (instead of once on the <body> level). It all adds up to the total CSS file size.
Having a style guide and class naming convention (like BEM, or Styleguide from Refocus) helps maintain your site clean and organized, reduces UI bugs and inconsistencies.
5.3 Disable features you don’t use
You have an option to enable “Ecommerce” features for your website (and soon — Logic and Membership). These features come with extra JS code and new pre-built pages, making your website significantly heavier (in the case of Ecommerce).
The nuisance thing about Webflow Ecommerce is that you cannot turn it off when enabled (as of 2022). A common problem is buying a template with the intention to use only CMS functionality but having to deal with Ecommerce features that were enabled in the template. I’ve been there; we had to migrate the whole site…
Make sure to check it before buying the template.
5.4 Preload critical links
You have an option to tell the browser to prefetch (or even prerender) the most important links your users are most likely to navigate to next. That way, the page will start loading in the background and open almost immediately when the user clicks on it.
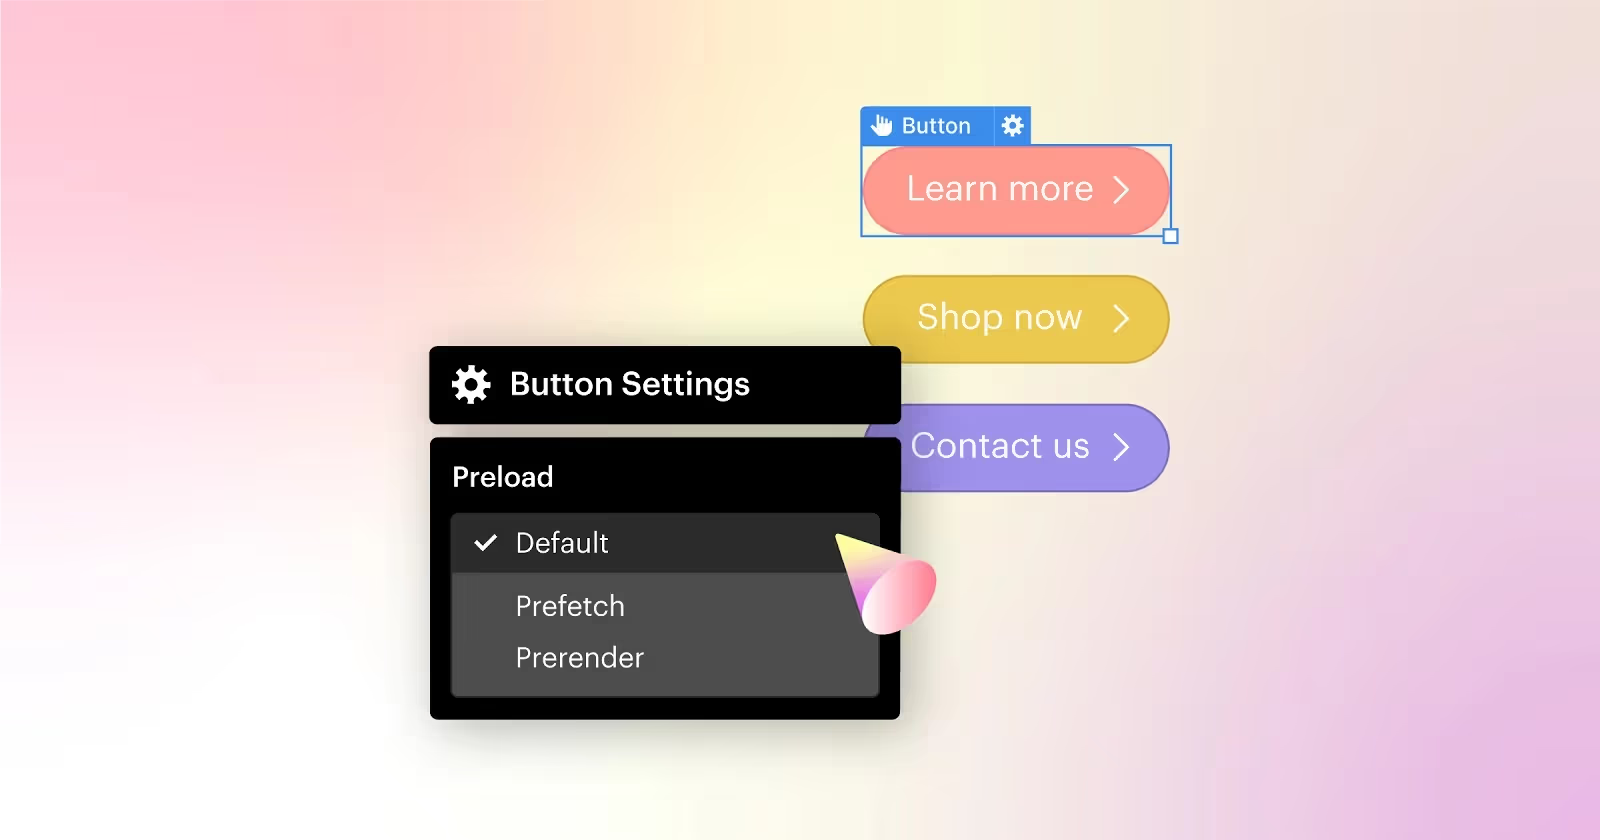
Good news: it’s very easy to do.
Bad news: it will put an extra burden on your current page and can slow down overall performance, so be sure to use this feature sparingly for only the most critical flows (typically purchase/contact/subscribe pages, your key Call-to-Actions).
6. General recommendations
6.1 Put an extra focus on the first section
The first visible section(s) is particularly important, cos it needs to load everything at once. Make sure you put extra effort into optimizing this section.
I’d recommend making it as lightweight as possible, preferably with no or very few small images (embedded SVGs if possible), lightweight animations, and effects only with code/gradient (god forbid heavy Lottie animations on the first section).
In the sections below you can place all your heavy videos, images, Lottie animations, or any other assets. Just make sure they are asynchronous and don’t block the initial load.
If performance is a priority for your site, discuss with your designers, marketers, and stakeholders ways to simplify the site to make it faster. Removing the dark/light theme toggle, special heavy animations or JS effects libraries will definitely help.
6.2 Test multiple times
Measuring your site performance through Lighthouse will fluctuate depending on your hardware, network, server response time, traffic congestion, and even browser extensions and software you have. That’s why to get an accurate picture; you need to run the test several times (5-10) and take the average.
6.3 Test on your own site
Depending on your site structure and organization, not all recommendations above will be applicable or might not improve performance. Always test in your own case to take into account your unique conditions.
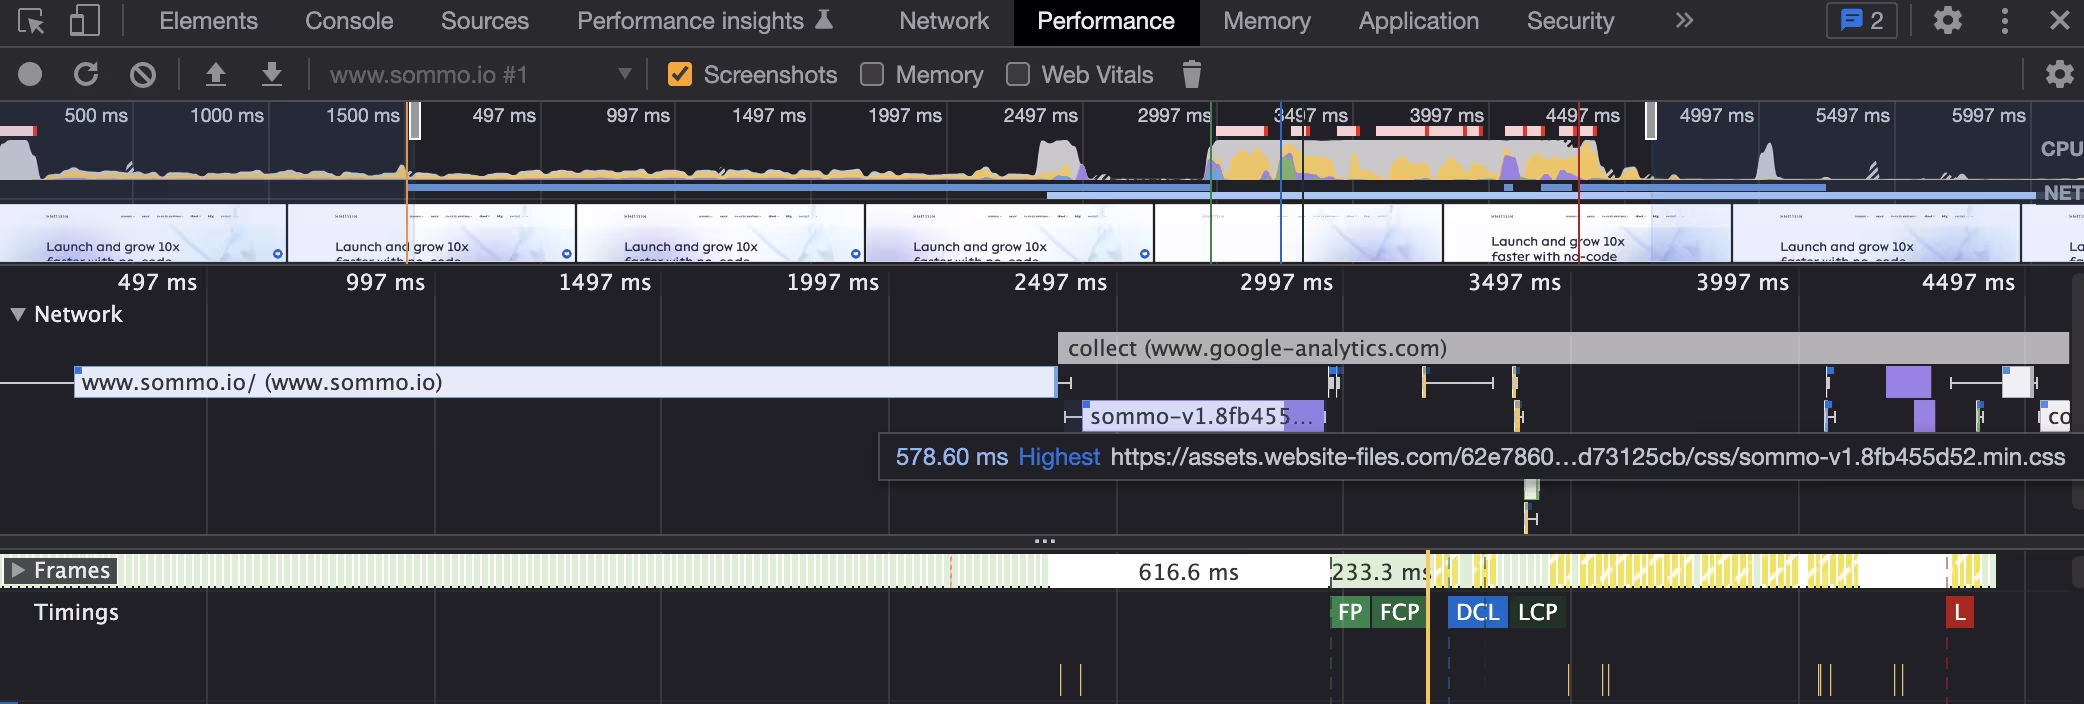
6.4 Learn to use Dev tools
Google Chrome has very powerful Dev tools. You can run a detailed network and performance analysis of your website, see all the requests and their timings, which steps took the most time, and what operations are the heaviest.
Web.dev site (particularly the Performance audits section) is also a great resource to learn more about Lighthouse / PSI metrics and how to improve them.
6.5 Accept the ‘yellow’ zone for your Webflow site
Webflow builds and serves the website in a way that makes it almost impossible to achieve a ‘green’ zone according to the Lighthouse metrics for any real production site with 15+ pages and at least several analytics. Even though we were able to achieve it, but only for a small site.
The key reasons are that Webflow cannot inline JS/CSS code, and serve the whole CSS/JS code as separate files for each page. It means that your pages will always need to make an extra request for critical CSS/JS, and load a lot of unused code for each page.
Vote here to push Webflow to allow inlining critical CSS for performance reasons.
6.6 Redeploy your site
For top performance (Lighthouse ‘green’ zone), you’ll have to part with Webflow.
However, there are still options to leverage a powerful Webflow Designer and publish a snappy site. For that, you’ll need to manually fetch all Webflow pages, inline and strip CSS, delay loading all the scripts, rebuild the whole website and deploy it to Cloudflare CDN. But it goes well beyond the scope of this article, and it violates Webflow Terms of Service, so definitely don’t do it 😉.
Contact us at Sommo to help you design and launch a great and fast Webflow site.


