


.avif)
If you’re wondering whether it’s worth localizing your Bubble app, the answer is “yes.”
Founders and app creators often consider app localization as a minor task. Still, it is critical for any business that wants to adapt products to new markets and users. Billions of potential customers choose to interact with apps in their language. They will only be satisfied with a quick translation or, even worse, with an over-reliance on their knowledge of the English language.
Here are some numbers to prove the importance of app translation and localization:
- 92% of multinational companies invest in localization
- 72% of customers are more likely to purchase their first language
- 52% of the world’s internet users are in Asia
- 50% of countries in the top 10 for app downloads don’t speak English
So, any business that wishes to expand its operations to other countries will have to go about localization. It can be challenging, but planning for it from the beginning will save you time and money.
Here are our experience, technical tips, and tricks on Bubble app localization.
What is app localization?
Website or app translation is adding the content of your website in the local language for target markets. It will mirror the style and tone but might need more context and nuance.
Localization goes beyond translation, making content appropriate for a given locale. App localization adapts your app to both the culture and language. You translate and change design and UX to make your Bubble app culturally relatable and relevant to local audiences.
Why should you localize your app?
Here are three specific benefits of app localization to keep in mind.
1. More Visits/Downloads/Installs.
Localizing your content can help you reach more people around the world.
2. Personalized UX as a competitive advantage.
The localized app gives you a decisive advantage when entering new markets. Localization can help you build a core of brand evangelists in any market. When your product is easy to use, it's easier to recommend it. Conversely, a poorly localized product can hurt your global sales and loyalty.
3. Increase in revenue.
Localization is an excellent way of increasing revenue - 76% of people prefer to buy products in their language, and 40% will never buy from websites in other languages.
Ways to localize your Bubble application
There are several ways to translate and localize an application manually and automatically.
Automatic localization using plugins
Localization with plugins is the fastest and most accessible method. It involves installing a plugin that translates the content using online translators.
The most popular localization plugins are:
This method is time-efficient, but the quality of the translation could be better. It is a good solution for simple phrases and words, and common languages. At the same time, translations into some languages will be a problem, even if the plugin supports them.
Localization using the built-in Bubble function (App Text)
The built-in Bubble translation feature is one of our tops, even though you should translate all your app's content manually. If you choose this method, put localization into an estimate at the beginning of development. Translation for an already completed application will take a lot of time.
Warning! This method is unsuitable for localizing application databases. It is intended solely for translating static texts, buttons, etc.
To use the built-in Bubble function, follow the steps below:
1. Create an Option Set for languages with the following parameters:
- Language name - to show the user's language in the relevant item,
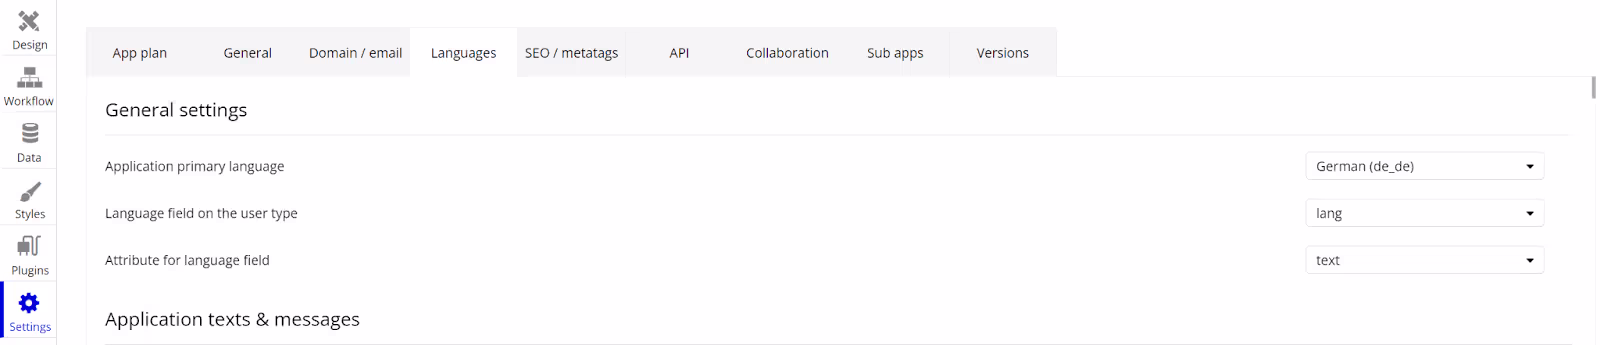
- Language code - to switch between languages (e.g., en_us). You can find all language codes on the Languages tab in the application settings.
2. Map this field to the User entity and the default language for the user.
3. Specify the field used for language selection and select the default language.
4. Create a translation for each unique element of your app; specify the item's name, a unique item ID (assigned automatically), and the translation text. For easy search, I recommend you use text, a short description, or a page name when creating the item name.
5. Translate elements using the “AppText” function.
6. Place a language switch on the page.
Important: The AppText function requires a page reload after each switch.
7. Export the language file by pressing the "Export" button and selecting the required languages.
8. Fill in the translation text.
9. Upload the file back using the "Import" button.
This method is simple but time-consuming. I can point out a few mistakes we made:
1. We decided to translate unique elements only within a single page, which increased the development time and created duplicates. We could avoid this by checking translated text for all pages before creating new items. If the text is not translated, you can create a new item without going to the “Language” tab.
2. Initially, we did not have a localization task. We ran into this when we had a massive amount of content. This slowed down development and made testing more difficult. The probability of missing an untranslated element has become much higher. You should plan localization before the start and translate simultaneously as developing the application.
3. From the very beginning of development, we had to create deep links that, after switching the language and reloading the page, would lead the user to the same screen/page.
Localization using the “Split by:” feature
This method is suitable for both localizing static texts and database content (except for content entered by a regular user). It is time-consuming, but does not require a page reload (unlike "AppText"), and allows you to avoid a lot of "Custom States" and unnecessary fields in the database.
Steps to localize your app with the “Split by:” feature:
1. Create an Option Set for languages with the following parameters:
- Language name - to show the user's language in the relevant item
- Language serial number - to switch between languages. For example, our Bubble application is localized into 2 languages, English and German, numbered 1 and 2, respectively.
2. Localize the database content. Enter the text in different languages in the corresponding fields. Use a separator to have the “Split by:” function split the text and convert it to a list.

3. Apply the "Split by:" in one of the ways:
a. Apply the command to the text and then select the serial number of the language:
b. The second option also takes into account that the text may be untranslated, in which case we need to show the contents of our field without using the "Split By:" command. This is done as follows:
We also have two alternative ideas how to localize static content using the "Split By:” feature.
The first one is pretty much the same as the one above. You need to create a database of translations and load it into an item from the database using "Split by:" to select the language.
Another method allows you to change the language without reloading the page, but it will take more time to translate all the elements since you cannot reuse existing translations. For this method, I also recommend you test the application's performance.
Summary: tips for localizing your Bubble app
Nowadays, localization is a cost-effective way to conquer new markets, create a loyal audience, and increase sales. We recommend you follow these guidelines to get it done quickly and reap all the benefits.
1. Keep localization in mind from the initial app development stage. Design an app to accommodate different languages right from the beginning. This principle will make the translation and localization process simpler later.
2. Think beyond translation. Content includes the entire app—images, colors, fonts, and more. Don't embed text into images. You can set the app to show and hide images easily if that's impossible.
3. Remember word order and different ways to pluralize. For example, there are several ways people around the world enter their names in form fields.
4. You must conduct localization testing on various devices with different screen sizes specific to those prevalent in a particular region.


